WPCargo Parcel Quotation Package Client User Manual
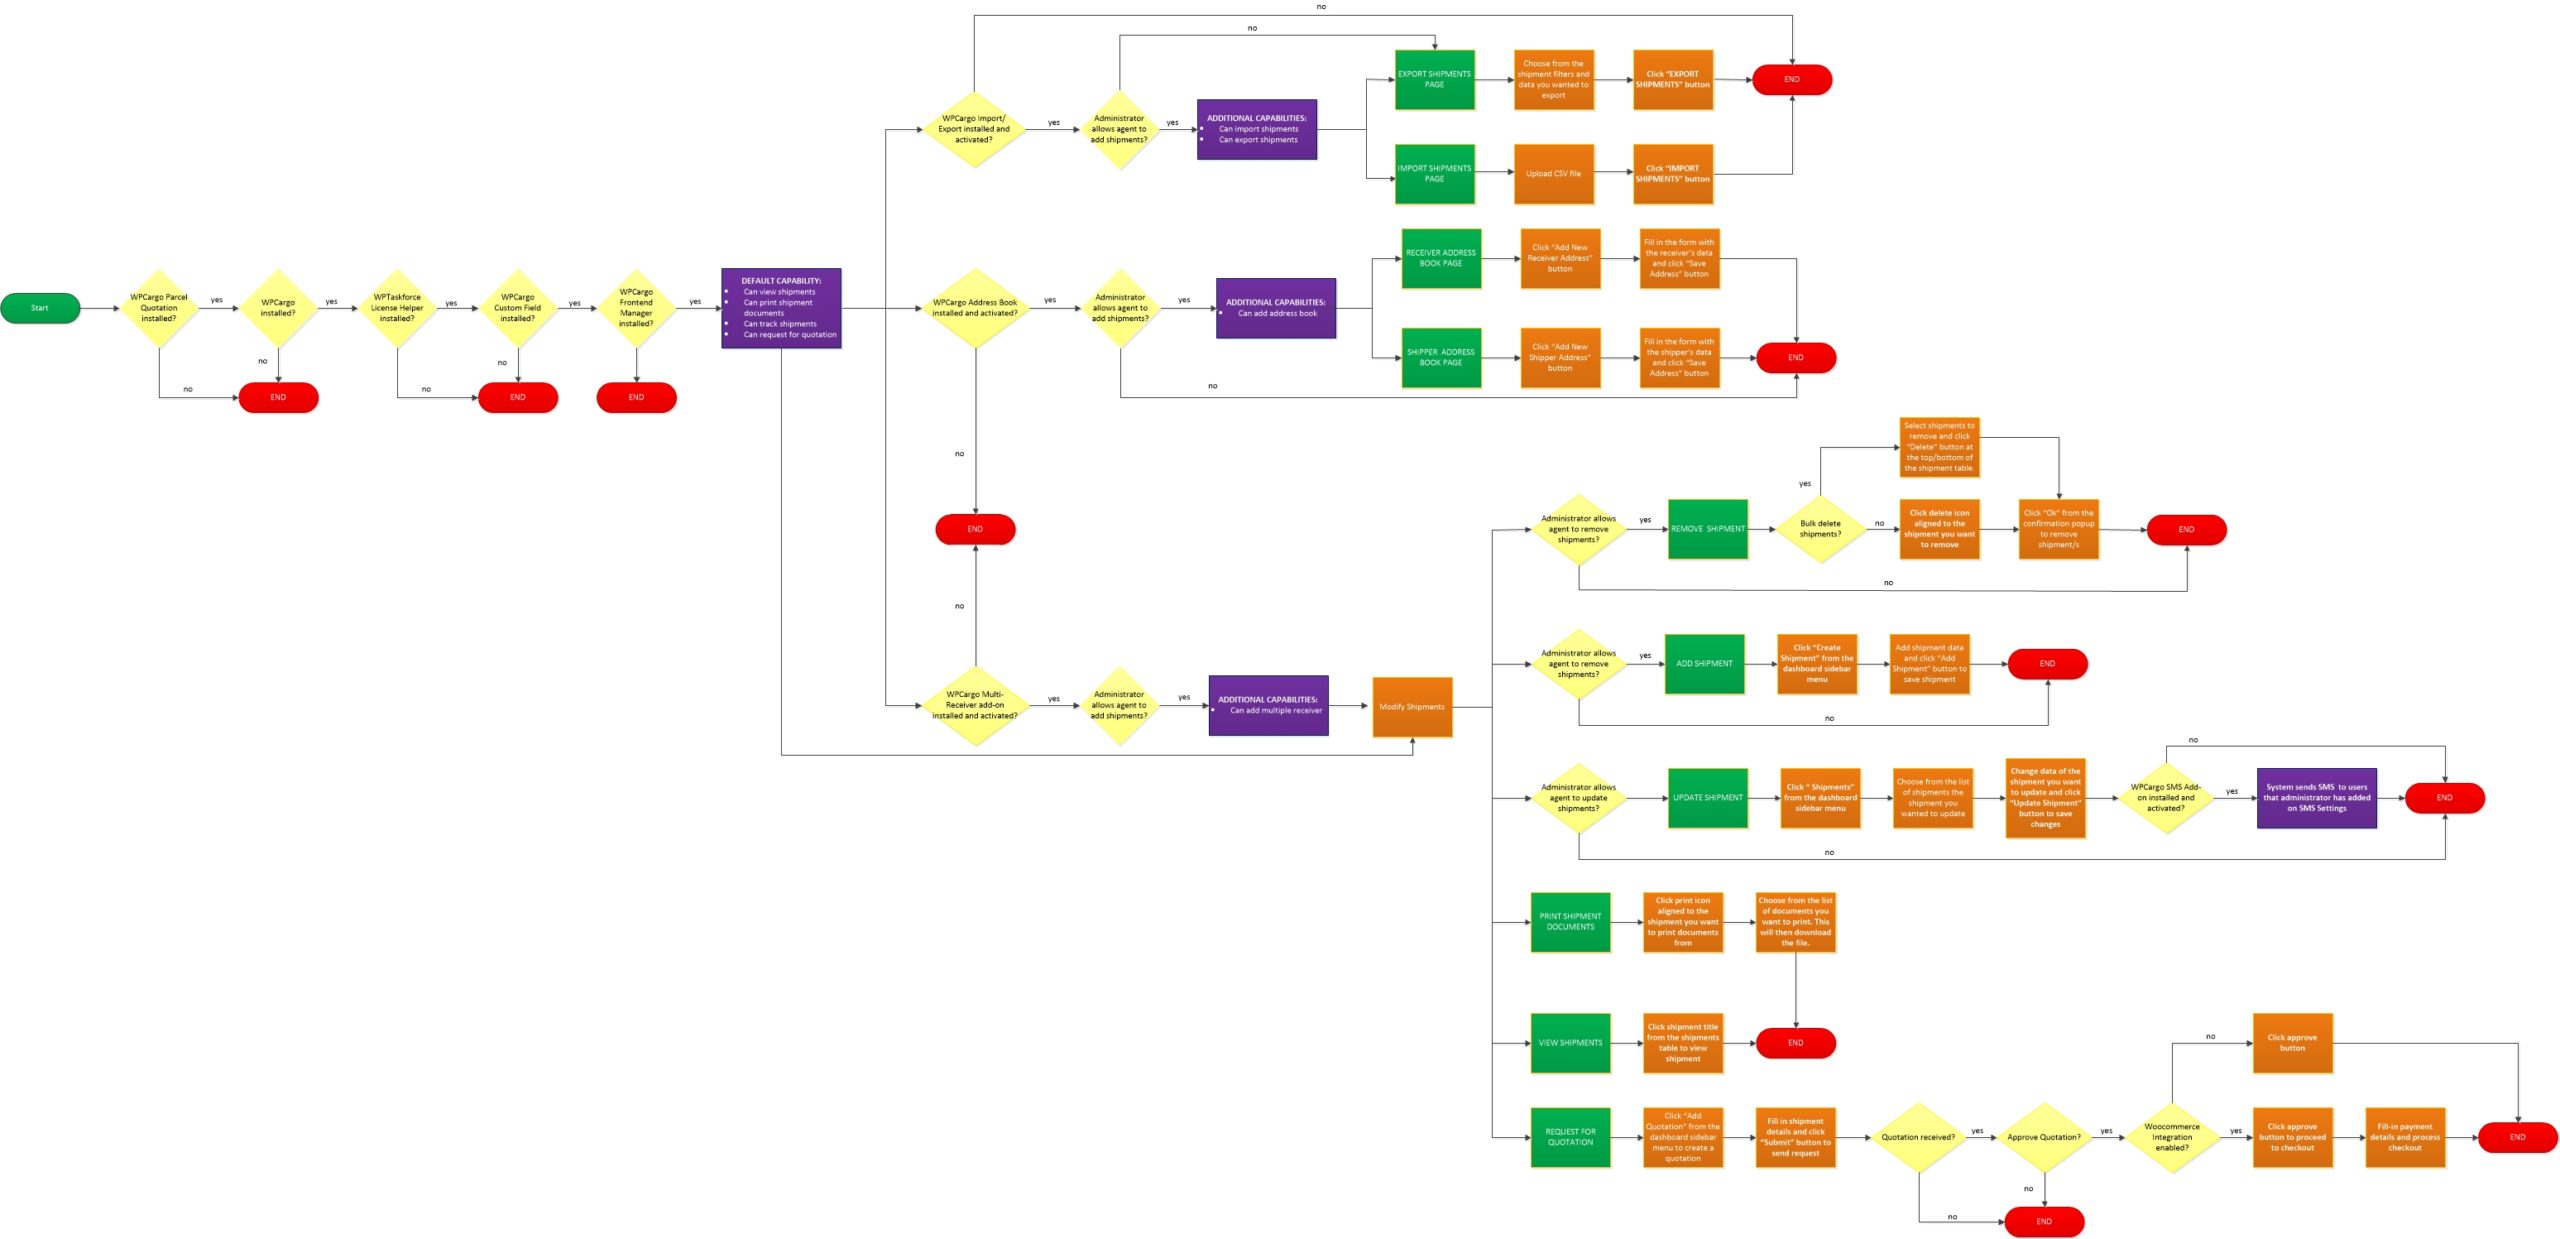
WPCargo Parcel Quotation Package client user role has the following default capabilities
- Can view shipments
- Can print shipment documents
- Can track shipments
- Can request for quotation
- Can export shipments
Note: Only shipments assigned to client are available for this capabilities
If administrator allows client to add shipments, client can then have the following additional capabilities
- Can create shipments
- Can import shipments
- Can add multiple receiver
- Can use address book
If the administrator allows the client to remove shipments, the client will have an additional capability of removing shipments they have created or assigned to them.
If the administrator allows the client to update shipments, the client will have an additional capability of updating shipments they have created or assigned to them.
How to view shipments
- Login to your account.
- Go to the Shipments page.
- Click the Shipment Number or view button to view shipment details
How to track shipments
- There are two ways to access the WPCargo tracking form
- If WPCargo Theme Pro is installed, track form will be available on the homepage banner.
- You can also access the tracking form through a page where the administrator has added the tracking form section.
- Copy your shipment number and paste on the shipment number field and submit.
- System will show the shipment data.
How to create shipments
- Go to Create Shipment page and fill in the shipment information.
- Click Submit to save the shipment.
Note: For more detailed instruction of creating shipments, please check guide here.
How to update shipments
- Go to the Shipments page.
- Click the update button to open shipment details.
- Change data of the field you want to update.
NOTE: For more detailed instruction of updating shipments, please check guide here.
How to bulk update status of shipment
- Select shipments you want to update status.
- Click the Bulk Update button at the bottom or top of the shipment table.
NOTE: For more detailed instruction of updating shipments, please check guide here.
How to remove shipments
- Go to the Shipments page.
- There are two ways to remove shipments
- Individual remove of shipments – Click the delete button aligned to the shipment your want to remove.
- Bulk remove of shipments – select shipments you want to remove and click the Delete button at the bottom or top of the shipment table.
NOTE: For more detailed instruction of removing shipments, please check guide here.
How to print shipment documents
- Go to the Shipments page.
- Click the print button and choose from the list of documents you want to print.
- Invoice
- Label
- Waybill
- BOL – this will only be available if administrator enables printing of BOL
- The system will download the file you want to print into a PDF format
NOTE: For more detailed printing of documents, check complete guide here.
How to request for quotation
- Go to the Add Quotation page and fill in the shipment information.
- Submit a request and wait for the administrator to approve the request.
- After the administrator has checked and approved the request, they will then quote the shipment and will send you an email with the shipment details and cost to be paid.
- Login to your account and approve the shipment quotation.
- There are two ways of approving the quotation.
- If Woocommerce integration is enabled, the page will redirect you to the checkout page to fill in billing information.
- If Woocommerce integration is disabled, the shipment status will be updated and payment process will be in between you and the administrator.
- There are two ways of approving the quotation.
- After the administrator has confirmed that the payment has been made, your shipment will be processed.
NOTE: For more detailed instruction for request for quotation, check complete guide here.
How to export shipments
- Go to the Import/Export page and fill in the shipment filters for the list of shipments you want to export.
- Shipper Name
- Status
- Date Range
- Shipment Data
- Click the Export Shipment button.
- The system will generate a CSV file with the list of shipments and the data you have chosen to export.
NOTE: For more detailed instruction of exporting shipments, please check guide here.
How to import shipments
- Go to the Import/Export page and download the CSV file template.
- Fill in the CSV file with the shipment details to its corresponding columns
- Upload the file on the Import page.
- Click the Import Shipment button to import the shipment data in the file you have uploaded.
NOTE: For more detailed instruction of importing shipments, please check guide here.
How to add shipper address book
- Go to the Address Book page and go to the Shipper Book Address tab.
- Click Add New Shipper button.
- Fill in the shipper details form from the popup.
- Click the Save Address button to save the address book.
How to add receiver address book
- Go to the Address Book page and go to the Receiver Book Address tab.
- Click Add New Receiver button.
- Fill in the receiver details form from the popup.
- Click the Save Address button to save the address book.
How to add multiple receiver
- Click Add Receiver button on Multiple Receiver section.
- Fill in receiver information.
- Click Add button to save receiver details.
How to consolidate shipments
- Go to Consolidate Shipments page.
- Choose from the list of shipments to be consolidated.
- Fill in Receiver details and choose from the Shipping Method and Packaging Options
- Submit shipment for administrator to add prices and fees.
- After administrator has added the prices, go to Consolidated Shipments page and go through payment process.
- After administrator has confirmed your payment, your shipment will be processed.