Step by Step Installation of WPCargo and the Add-ons

Please follow these steps on how to setup/install WPCargo and the Add-ons

    1. Install the latest version of WPCargo.
    2. Install the Add-ons that you bought
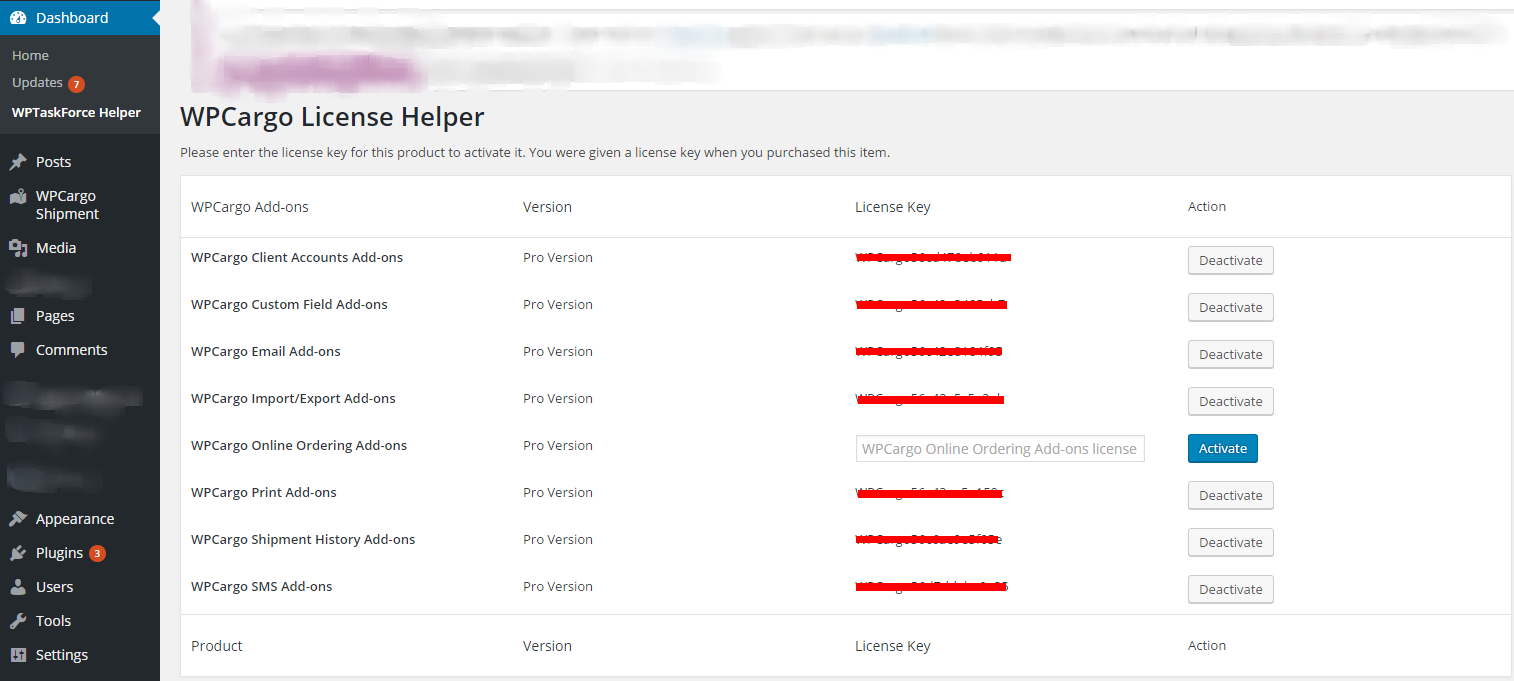
      WPTaskForce License Helper
      – WPCargo Client Accounts Add-ons
      – WPCargo Courier Add-ons
      – WPCargo Custom Field Add-ons
      – WPCargo Import and Export Add-ons
      – WPCargo Pick-up Management Add-ons
      – WPCargo Shipment History Add-ons
      – WPCargo SMS Add-ons


    1. Activate your License ( It is given to you after you have successfully bought the product )
      Now go to WPCargo>WPTaskforce Helper and add the license on license key field
      Please see this page about activating the plugin.


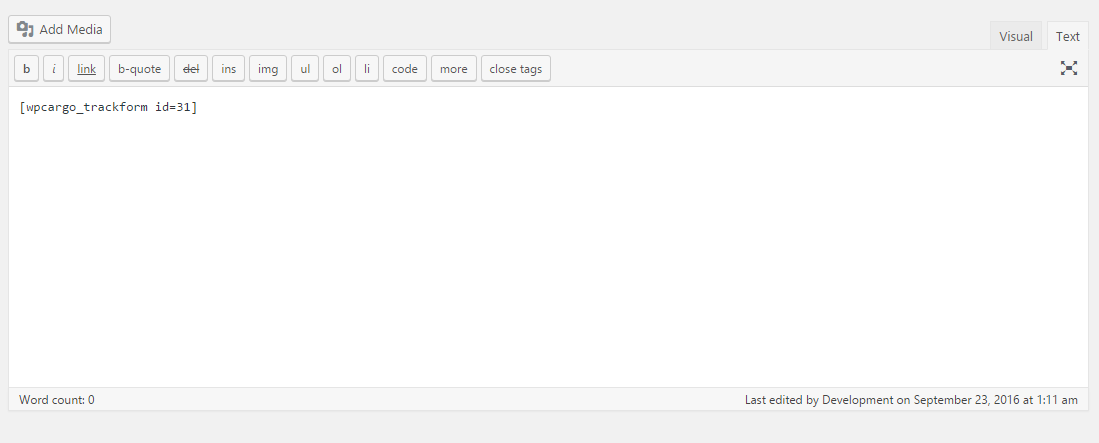
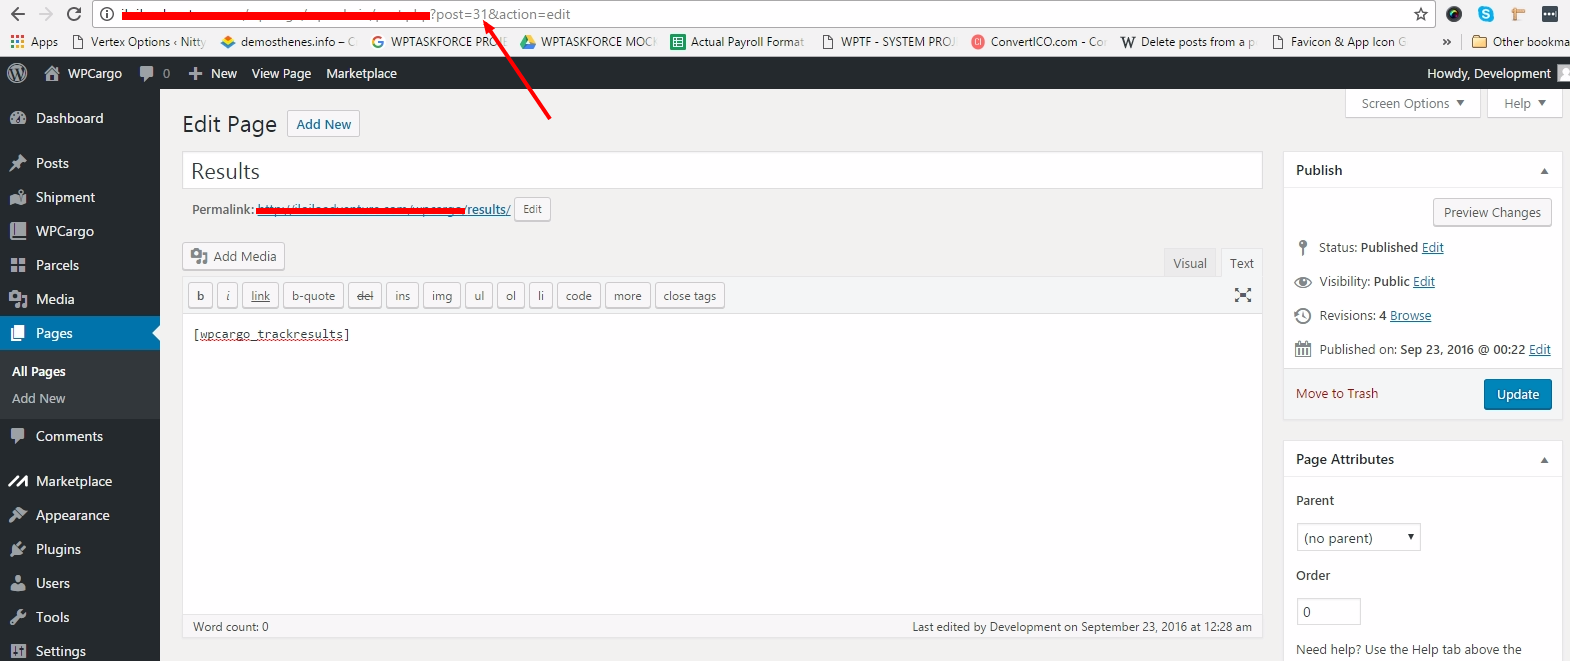
    1. We can now setup pages for the Tracking Form and the Results
      – Create a Page Where you can add a shortcode for Track Form and Results
      Shortcode

      Enter the Consignment No.

      Ex: 12345

      – This shortcode is for the Track form, the id attribute is the id of the Result Page. And if you want the Track Form and the Results only on the single page just remove the id attribute.

      Enter the Consignment No.

      Ex: 12345

      – This is for the Results Page.


    1. We can now setup the settings of WPCargo
      – Go to WPCargo>General Settings where you can setup the options of the field that have an option, if you install the WPCargo Custom Fields you can edit the options on WPCargo>Manage Form Fields
      – You can Also add the logo on General Settings Page
      – You can also enable the automated Title or Tracking Number on General Settings, it is on Enable WPCargo Title Prefix and the WPCargo Title Prefix
      – You can also activate the automated Email after the shipment status is updated, it is on WPCargo>Email Settingswpcargo-settings


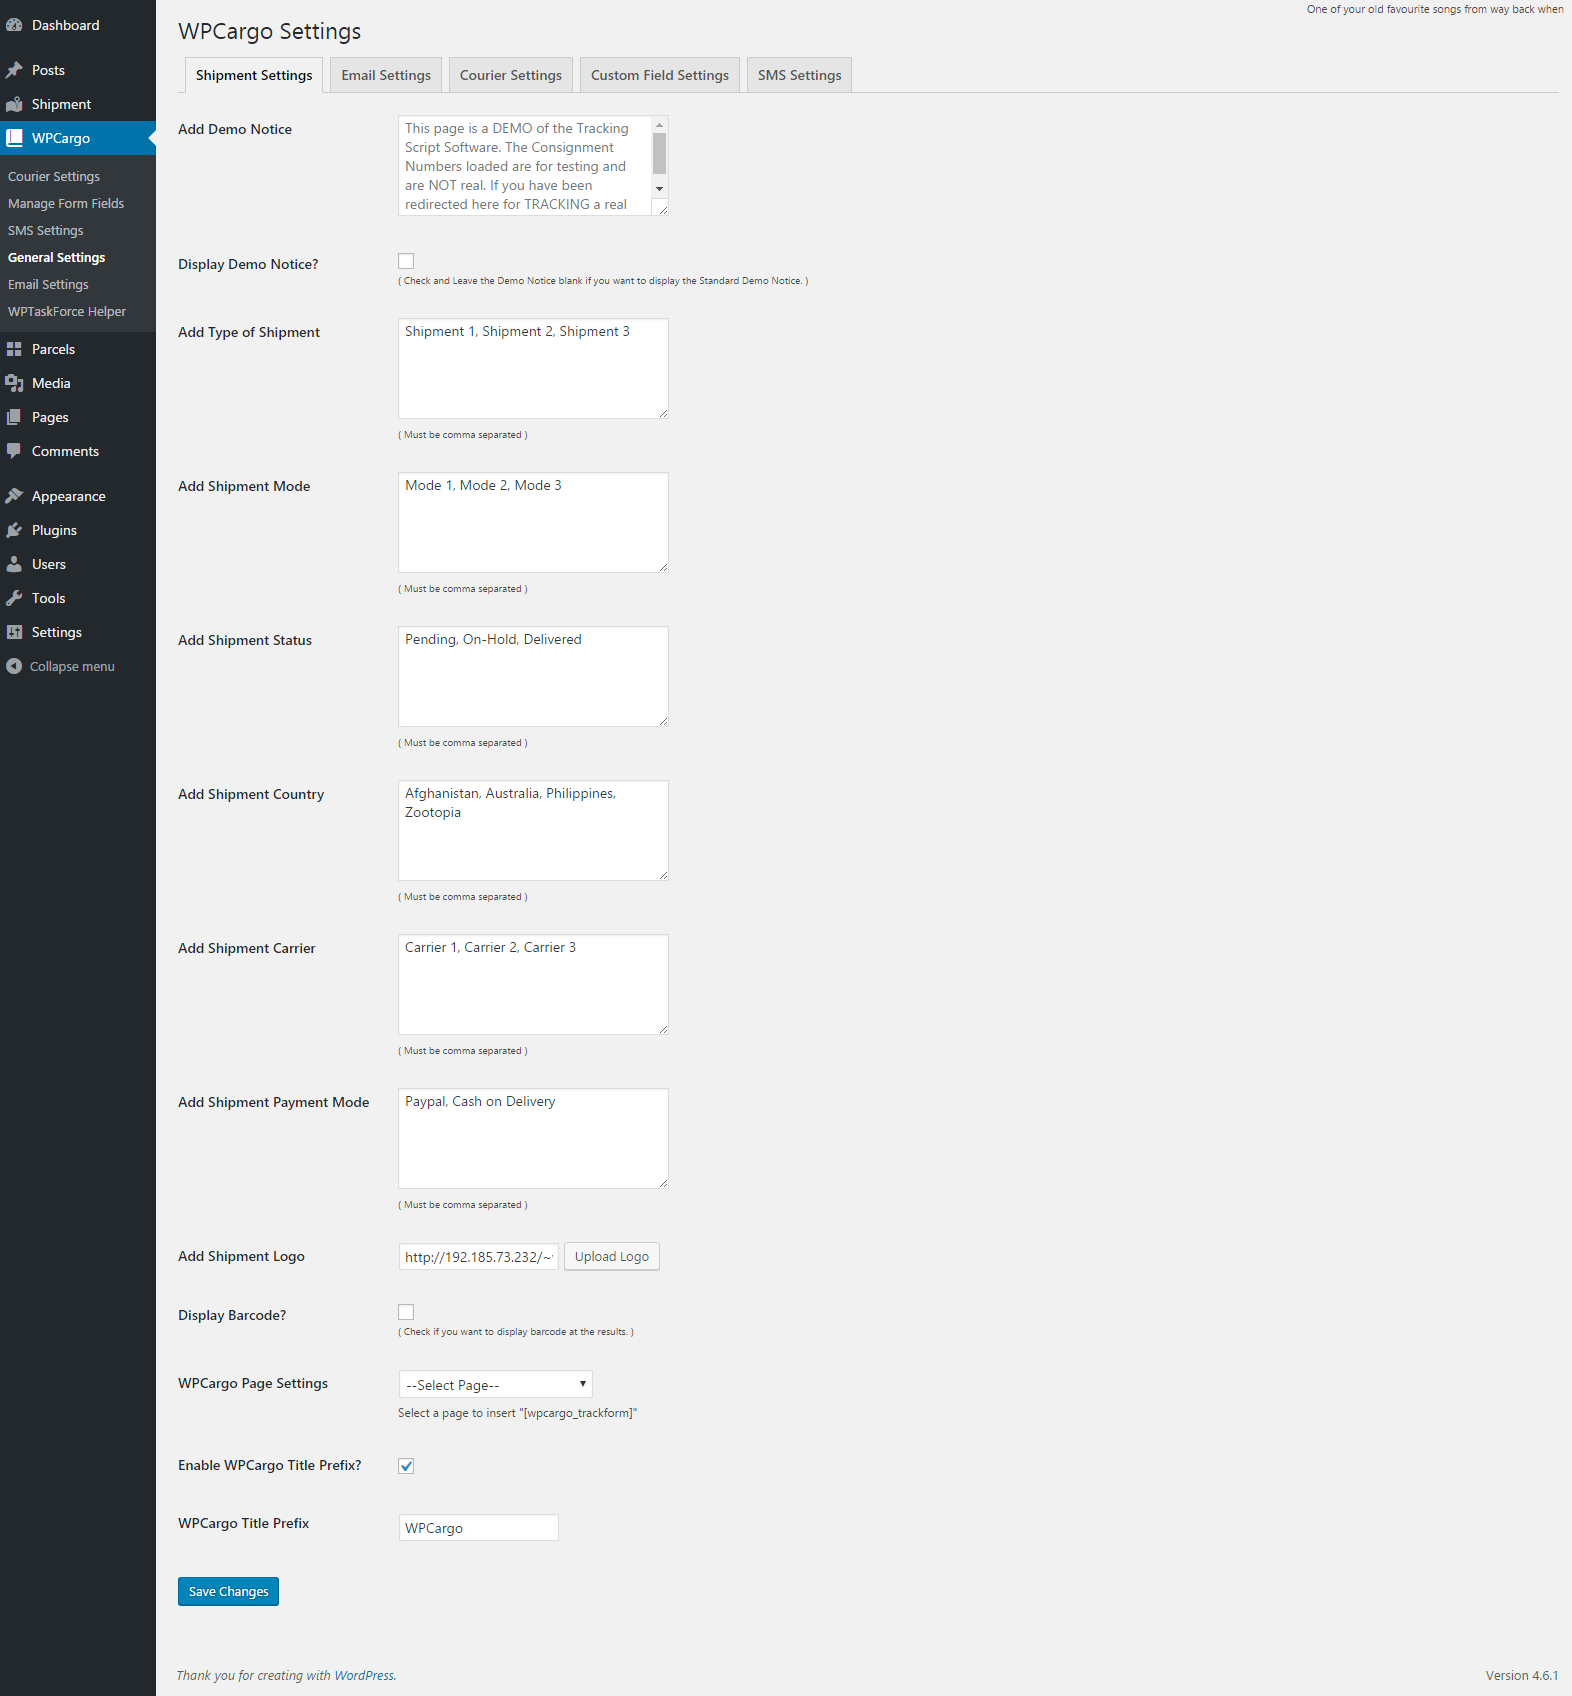
    1. This next step is for those who have WPCargo Client Accounts Add-ons
      Shortcode
      – This is for the lists of Shipment of your WPCargo Client User


How to Install and add License Key to the WPCargo Add ons

[vc_row][vc_column width=”1/3″][vc_widget_sidebar sidebar_id=”sidebar_3″][/vc_column][vc_column width=”2/3″][vc_column_text]

How to Install and add License Key to the WPCargo Add ons

Steps on how to install the add-ons.

1. Download the plugins emailed after you successfully bought it.

2. Install the WPTaskForce Helper

3. Install the Add-ons

4. After you Install the plugins go to your admin Dashboard->WPTaskForce Helper then put the License given after you bought the plugin successfully.

WPTaskForce License Helper ‹ WPCargo Development — WordPress[/vc_column_text][vc_raw_html]JTNDc2NyaXB0JTIwYXN5bmMlMjBzcmMlM0QlMjIlMkYlMkZwYWdlYWQyLmdvb2dsZXN5bmRpY2F0aW9uLmNvbSUyRnBhZ2VhZCUyRmpzJTJGYWRzYnlnb29nbGUuanMlMjIlM0UlM0MlMkZzY3JpcHQlM0UlMEElM0NpbnMlMjBjbGFzcyUzRCUyMmFkc2J5Z29vZ2xlJTIyJTBBJTIwJTIwJTIwJTIwJTIwc3R5bGUlM0QlMjJkaXNwbGF5JTNBYmxvY2slM0IlMjB0ZXh0LWFsaWduJTNBY2VudGVyJTNCJTIyJTBBJTIwJTIwJTIwJTIwJTIwZGF0YS1hZC1sYXlvdXQlM0QlMjJpbi1hcnRpY2xlJTIyJTBBJTIwJTIwJTIwJTIwJTIwZGF0YS1hZC1mb3JtYXQlM0QlMjJmbHVpZCUyMiUwQSUyMCUyMCUyMCUyMCUyMGRhdGEtYWQtY2xpZW50JTNEJTIyY2EtcHViLTA1MDY1Mzg0MjY0NTY4NzclMjIlMEElMjAlMjAlMjAlMjAlMjBkYXRhLWFkLXNsb3QlM0QlMjIxNjk0OTc1MjIyJTIyJTNFJTNDJTJGaW5zJTNFJTBBJTNDc2NyaXB0JTNFJTBBJTIwJTIwJTIwJTIwJTIwJTI4YWRzYnlnb29nbGUlMjAlM0QlMjB3aW5kb3cuYWRzYnlnb29nbGUlMjAlN0MlN0MlMjAlNUIlNUQlMjkucHVzaCUyOCU3QiU3RCUyOSUzQiUwQSUzQyUyRnNjcmlwdCUzRQ==[/vc_raw_html][/vc_column][/vc_row]

How to Set-up WPCargo Pages

After Installing WPCargo on your WordPress Website it will generate a track-form Page with shortcode

Enter the Consignment No.

Ex: 12345

Note – This shortcode is a one page template only if you want the results to be on the other page please add the attribute id=page id


Example

On Track Form you will add the 

Enter the Consignment No.

Ex: 12345

On your results page –

Enter the Consignment No.

Ex: 12345


Track Form

trackform


Results

results