Tutorial and Images

[vc_row][vc_column][/vc_column][/vc_row][vc_row][vc_column width=”1/4″][vc_widget_sidebar sidebar_id=”sidebar_3″ title=”Get Started”][/vc_column][vc_column width=”3/4″][vc_column_text]

Getting Started

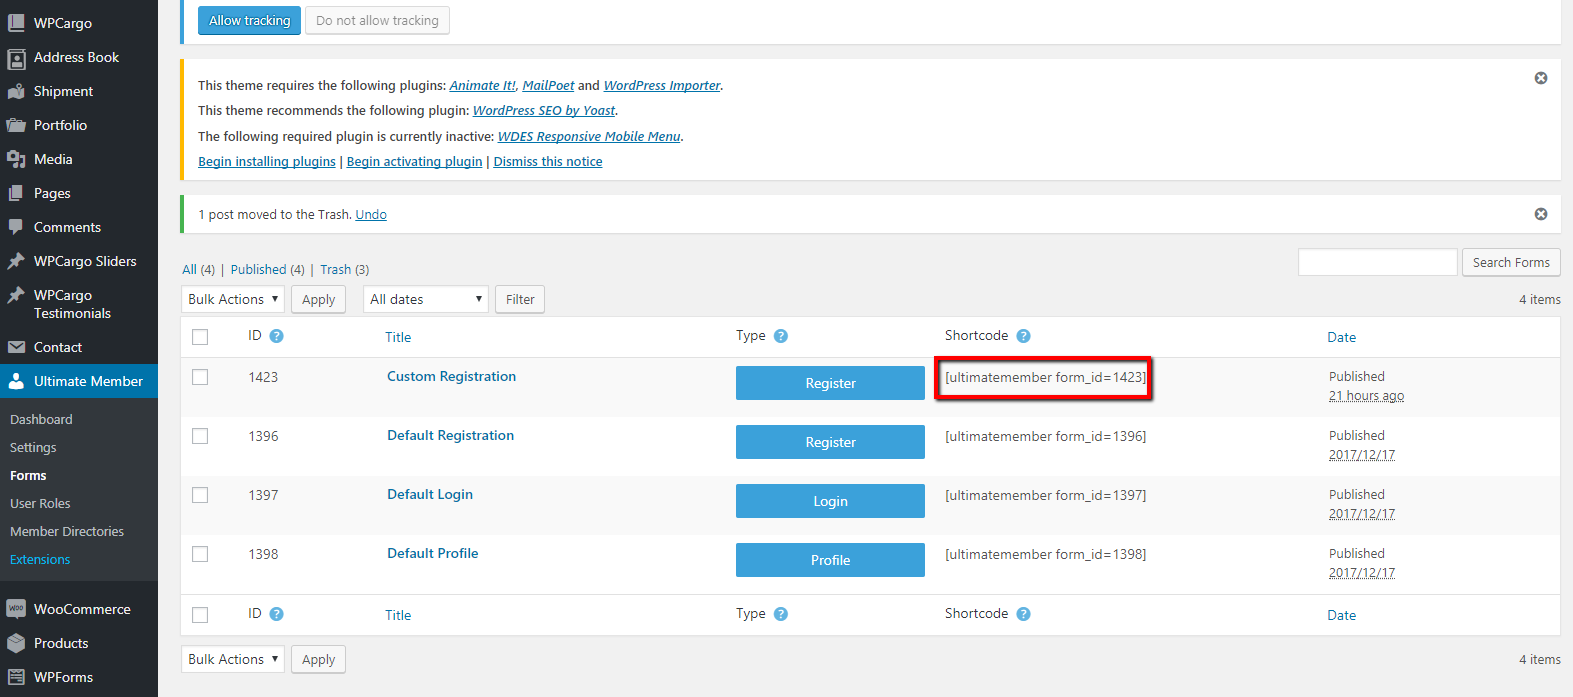
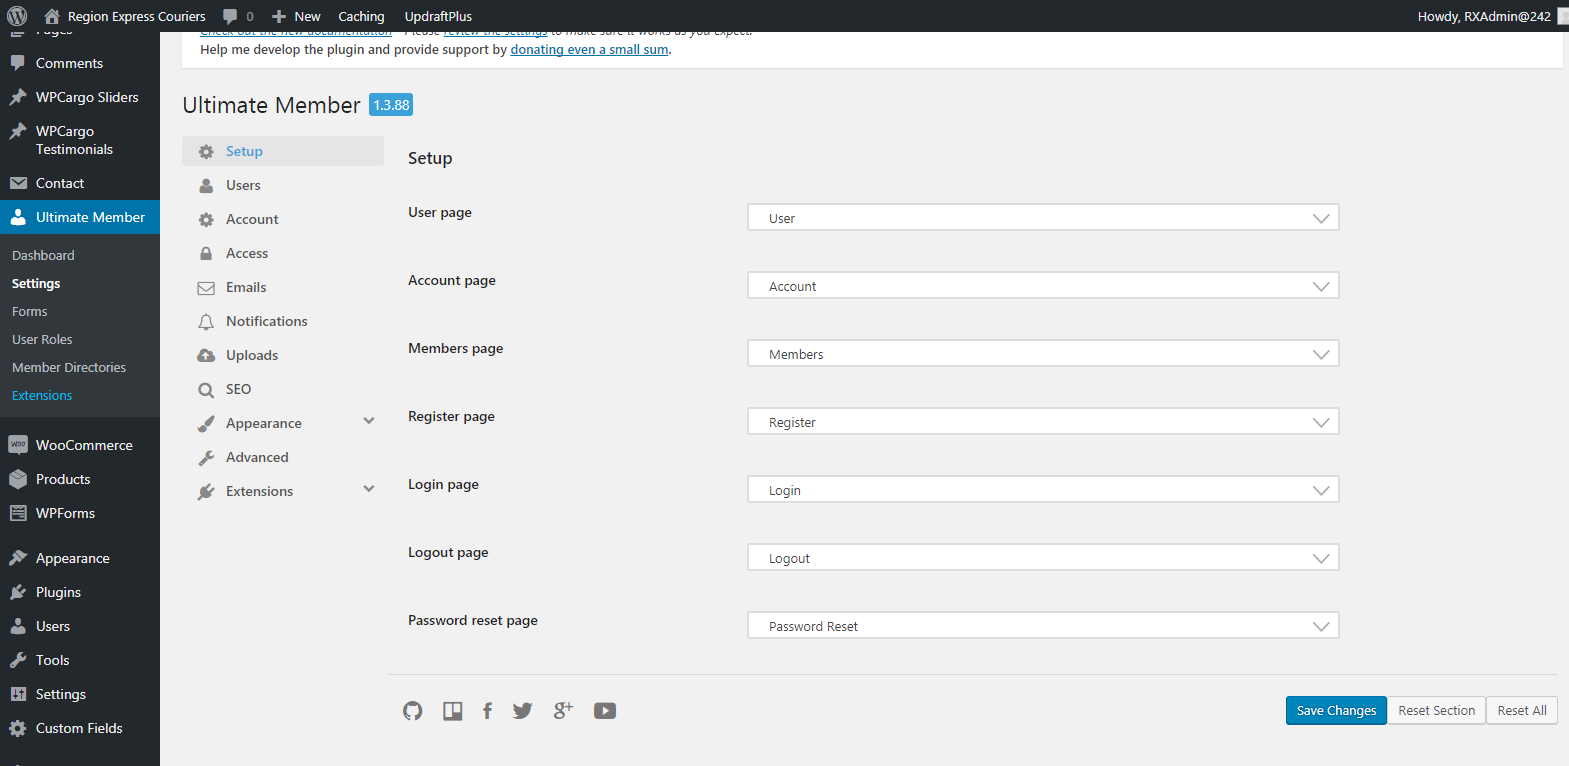
We have several guides to help you get started with the WPCargo Track & Trace Plugin.

These guides cover:


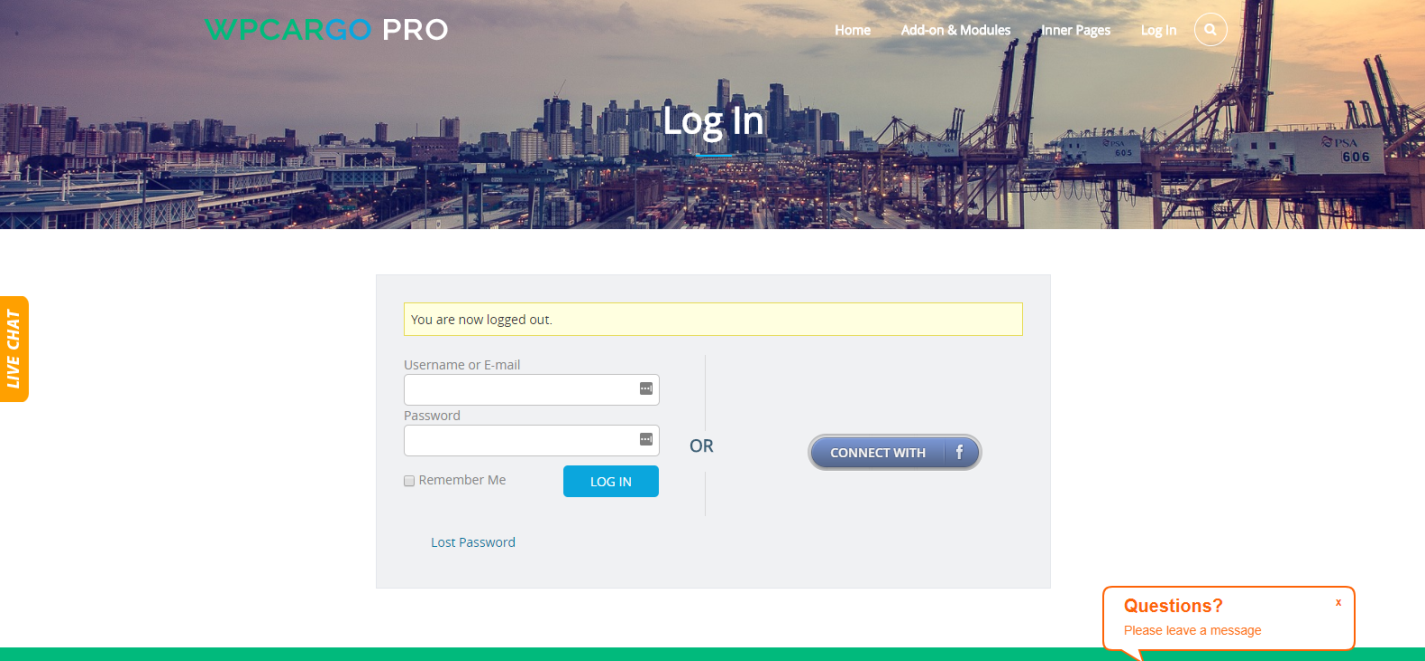
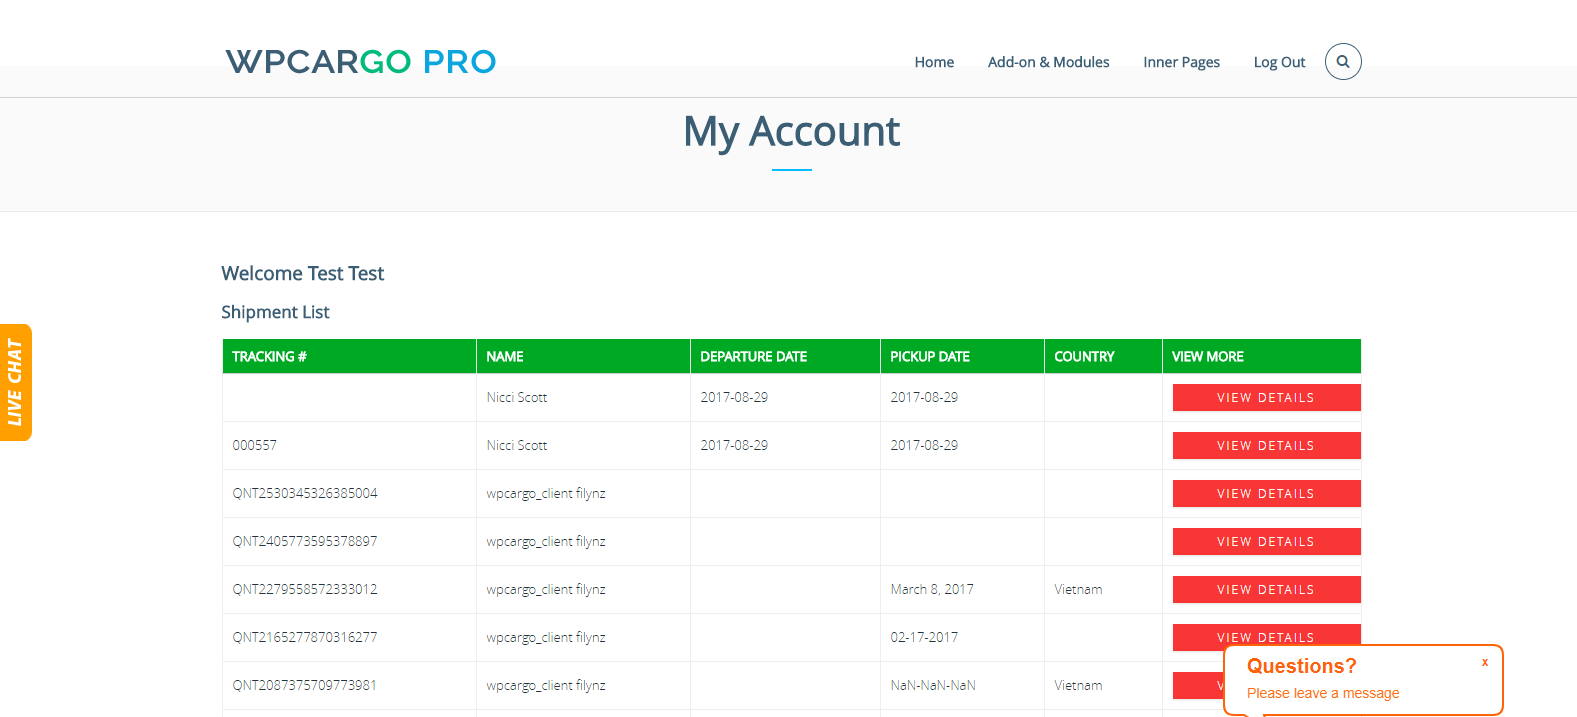
Once you’ve finished setting up the system, you can start using it.[/vc_column_text][vc_raw_html]JTNDc2NyaXB0JTIwYXN5bmMlMjBzcmMlM0QlMjIlMkYlMkZwYWdlYWQyLmdvb2dsZXN5bmRpY2F0aW9uLmNvbSUyRnBhZ2VhZCUyRmpzJTJGYWRzYnlnb29nbGUuanMlMjIlM0UlM0MlMkZzY3JpcHQlM0UlMEElM0NpbnMlMjBjbGFzcyUzRCUyMmFkc2J5Z29vZ2xlJTIyJTBBJTIwJTIwJTIwJTIwJTIwc3R5bGUlM0QlMjJkaXNwbGF5JTNBYmxvY2slM0IlMjB0ZXh0LWFsaWduJTNBY2VudGVyJTNCJTIyJTBBJTIwJTIwJTIwJTIwJTIwZGF0YS1hZC1sYXlvdXQlM0QlMjJpbi1hcnRpY2xlJTIyJTBBJTIwJTIwJTIwJTIwJTIwZGF0YS1hZC1mb3JtYXQlM0QlMjJmbHVpZCUyMiUwQSUyMCUyMCUyMCUyMCUyMGRhdGEtYWQtY2xpZW50JTNEJTIyY2EtcHViLTA1MDY1Mzg0MjY0NTY4NzclMjIlMEElMjAlMjAlMjAlMjAlMjBkYXRhLWFkLXNsb3QlM0QlMjIxNjk0OTc1MjIyJTIyJTNFJTNDJTJGaW5zJTNFJTBBJTNDc2NyaXB0JTNFJTBBJTIwJTIwJTIwJTIwJTIwJTI4YWRzYnlnb29nbGUlMjAlM0QlMjB3aW5kb3cuYWRzYnlnb29nbGUlMjAlN0MlN0MlMjAlNUIlNUQlMjkucHVzaCUyOCU3QiU3RCUyOSUzQiUwQSUzQyUyRnNjcmlwdCUzRQ==[/vc_raw_html][/vc_column][/vc_row]

We have released latest version of WPCargo Version 5.0.0

In this released, we updated the user-friendliness of the dashboard specially in adding your shipment details, fix bugs in notices and add more settings.As with all updates we recommend users update as soon as possible.

Added on our Latest Version

– Add print label functionaly for the shipment.
– Add some styling for the data display consistency.
– Add option to Display Shipment History in result Page (General Settings).
– Update Shipment hitory template. Removed the add shipment history and add admin restriction for the user role to update shipment history (General Settings).
– Remove the Shipment Status in the Shipment fields.
– Merge the Shipment Status with the Shipment History form fields ( note: Add shipment History form above Publish Button ).
– Fixed bug with the Custom Field add on compatibilty
– Add the followig Filters for shipment data customization
– “wpcargo_status_option” – accepts one parameter ( must be array value ). this will affect the wpcargo status options.
– “wpc_shipper_name_table_data” – accept string ( metakey ). This will replace the Shipper name column in the Shipment table.
– “wpc_receiver_name_table_data” – accept string ( metakey ). This will replace the Receiver name column in the Shipment table.
– “wpc_report_search_shipper_name_metakey” – accept string ( metakay ). This will change the shipment metakey to be search in Senders name in Report page.
– “label_template_url” – Accept file Path. This will replace the Shipment label template.

Receiver / Shipping Address book

[vc_row][vc_column][vc_column_text]

Receiver / Shipping Address book

  • Select Shipper Book Address
  • Click the “Add new receiver address” button
  • Fill up all the information shown and then click the “Add address” button


  • You can also, edit your Book Address just click the update button and then if you’re done editing click the update address button


  • Select Receiver Book Address
  • Click the “Add new receiver address” button
  • Fill up all the information shown and then click the “Add address” button


  • You can also, edit your Book Address just click the update button and then if you’re done editing click the update address button


[/vc_column_text][/vc_column][/vc_row]

How to setup registration, login and my account page in WPCargo using Ultimate Member – User Profile & Membership Plugin

[vc_row][vc_column width=”1/4″][vc_widget_sidebar sidebar_id=”sidebar_3″][/vc_column][vc_column width=”3/4″][vc_column_text]

How to setup registration, login and my account page in WPCargo using Ultimate Member – User Profile & Membership Plugin

This is a step by step guide to help you setup the Login or Registration in WPCargo using Theme My Login Plugin(TML) in WordPress.

  1. Install Ultimate Member plug in.
    • In your WordPress dashboard, go to Appearance > Plug-ins then download and install Ultimate Member – User Profile & Membership Plugin.
  2. When you activate Ultimate Member, the plugin will install six default pages which are required for the plugin to work correctly. The six pages are: register, login, user, account, members, logout. Apart from the members page these pages are a core requirement of Ultimate Member and they cannot be deleted from your site.
  3. But if you wish to create your custom form in your WordPress dashboard, go to Ultimate Member > Forms.
  4. You can either edit existing default forms or you can create your own custom form.
  5. On your form builder, add fields you wish to display on your form.
  6. After you have finished your custom form, you can copy the shortcode and paste it on the page you chose to display it.
  7. You can also choose your custom redirection. Go to Ultimate Member > Settings.

[/vc_column_text][vc_raw_html]JTNDc2NyaXB0JTIwYXN5bmMlMjBzcmMlM0QlMjIlMkYlMkZwYWdlYWQyLmdvb2dsZXN5bmRpY2F0aW9uLmNvbSUyRnBhZ2VhZCUyRmpzJTJGYWRzYnlnb29nbGUuanMlMjIlM0UlM0MlMkZzY3JpcHQlM0UlMEElM0NpbnMlMjBjbGFzcyUzRCUyMmFkc2J5Z29vZ2xlJTIyJTBBJTIwJTIwJTIwJTIwJTIwc3R5bGUlM0QlMjJkaXNwbGF5JTNBYmxvY2slM0IlMjB0ZXh0LWFsaWduJTNBY2VudGVyJTNCJTIyJTBBJTIwJTIwJTIwJTIwJTIwZGF0YS1hZC1sYXlvdXQlM0QlMjJpbi1hcnRpY2xlJTIyJTBBJTIwJTIwJTIwJTIwJTIwZGF0YS1hZC1mb3JtYXQlM0QlMjJmbHVpZCUyMiUwQSUyMCUyMCUyMCUyMCUyMGRhdGEtYWQtY2xpZW50JTNEJTIyY2EtcHViLTA1MDY1Mzg0MjY0NTY4NzclMjIlMEElMjAlMjAlMjAlMjAlMjBkYXRhLWFkLXNsb3QlM0QlMjIxNjk0OTc1MjIyJTIyJTNFJTNDJTJGaW5zJTNFJTBBJTNDc2NyaXB0JTNFJTBBJTIwJTIwJTIwJTIwJTIwJTI4YWRzYnlnb29nbGUlMjAlM0QlMjB3aW5kb3cuYWRzYnlnb29nbGUlMjAlN0MlN0MlMjAlNUIlNUQlMjkucHVzaCUyOCU3QiU3RCUyOSUzQiUwQSUzQyUyRnNjcmlwdCUzRQ==[/vc_raw_html][/vc_column][/vc_row]

WPCargo Quotation Addon Online Process Guide

[vc_row][vc_column][vc_column_text]

  1. HOME PAGE

2. You will be redirected to http://wpcargo.com/complete-demo/my-account/

  1. Click Addons & Modules
  • Select Customer/ Client


  1. You will be redirected to http://wpcargo.com/complete-demo/parcel-quotation-dashboard/
  • Click the Submit New Order Request button

  1. You will be redirected to http://wpcargo.com/complete-demo/parcel-quotation/
  • Complete all fields and click “Submit” button to proceed


6.  You will be redirected to http://wpcargo.com/complete-demo/checkout/

  • Complete all fields and click “Place Order” button to proceed


7. You will be redirected to http://wpcargo.com/complete-demo/checkout/order-received/4859/?key=wc_order_5a1e603b69371

  • You will see the confirmation of the order you received


[/vc_column_text][vc_raw_html]JTNDc2NyaXB0JTIwYXN5bmMlMjBzcmMlM0QlMjIlMkYlMkZwYWdlYWQyLmdvb2dsZXN5bmRpY2F0aW9uLmNvbSUyRnBhZ2VhZCUyRmpzJTJGYWRzYnlnb29nbGUuanMlMjIlM0UlM0MlMkZzY3JpcHQlM0UlMEElM0NpbnMlMjBjbGFzcyUzRCUyMmFkc2J5Z29vZ2xlJTIyJTBBJTIwJTIwJTIwJTIwJTIwc3R5bGUlM0QlMjJkaXNwbGF5JTNBYmxvY2slM0IlMjB0ZXh0LWFsaWduJTNBY2VudGVyJTNCJTIyJTBBJTIwJTIwJTIwJTIwJTIwZGF0YS1hZC1sYXlvdXQlM0QlMjJpbi1hcnRpY2xlJTIyJTBBJTIwJTIwJTIwJTIwJTIwZGF0YS1hZC1mb3JtYXQlM0QlMjJmbHVpZCUyMiUwQSUyMCUyMCUyMCUyMCUyMGRhdGEtYWQtY2xpZW50JTNEJTIyY2EtcHViLTA1MDY1Mzg0MjY0NTY4NzclMjIlMEElMjAlMjAlMjAlMjAlMjBkYXRhLWFkLXNsb3QlM0QlMjIxNjk0OTc1MjIyJTIyJTNFJTNDJTJGaW5zJTNFJTBBJTNDc2NyaXB0JTNFJTBBJTIwJTIwJTIwJTIwJTIwJTI4YWRzYnlnb29nbGUlMjAlM0QlMjB3aW5kb3cuYWRzYnlnb29nbGUlMjAlN0MlN0MlMjAlNUIlNUQlMjkucHVzaCUyOCU3QiU3RCUyOSUzQiUwQSUzQyUyRnNjcmlwdCUzRQ==[/vc_raw_html][/vc_column][/vc_row]