Woocommerce and WPCargo Integration

[vc_row][vc_column width=”1/4″][vc_widget_sidebar sidebar_id=”sidebar_3″][/vc_column][vc_column width=”3/4″][vc_column_text]We already created a add-ons for the Woocommerce and WPCargo Integration. This is the step by step for setting up the add-ons.

Please follow these steps.

  1. You need to install the Latest Version of Woocommerce.
  2. Install the latest version of WPCargo.
  3. Install Woocommerce and WPCargo Integration add-ons (Please do contact us for more info about the add-ons)
  4. Create a product in Woocommerce and the product price is 0
  5. Go to WPCargo>Woocommerce and WPCargo Integration Settings and choose the product that you created.
  6. Create a page for quotation Shortcode to use for quotation page – [wpcargo_cargo_quote result_page_id=”402″]
    result_page_id attribute is for the result page of the quotation.
  7. For the Result Page Shortcode – [wpcargo_cargo_quote_result]

[/vc_column_text][vc_raw_html]JTNDc2NyaXB0JTIwYXN5bmMlMjBzcmMlM0QlMjIlMkYlMkZwYWdlYWQyLmdvb2dsZXN5bmRpY2F0aW9uLmNvbSUyRnBhZ2VhZCUyRmpzJTJGYWRzYnlnb29nbGUuanMlMjIlM0UlM0MlMkZzY3JpcHQlM0UlMEElM0NpbnMlMjBjbGFzcyUzRCUyMmFkc2J5Z29vZ2xlJTIyJTBBJTIwJTIwJTIwJTIwJTIwc3R5bGUlM0QlMjJkaXNwbGF5JTNBYmxvY2slM0IlMjB0ZXh0LWFsaWduJTNBY2VudGVyJTNCJTIyJTBBJTIwJTIwJTIwJTIwJTIwZGF0YS1hZC1sYXlvdXQlM0QlMjJpbi1hcnRpY2xlJTIyJTBBJTIwJTIwJTIwJTIwJTIwZGF0YS1hZC1mb3JtYXQlM0QlMjJmbHVpZCUyMiUwQSUyMCUyMCUyMCUyMCUyMGRhdGEtYWQtY2xpZW50JTNEJTIyY2EtcHViLTA1MDY1Mzg0MjY0NTY4NzclMjIlMEElMjAlMjAlMjAlMjAlMjBkYXRhLWFkLXNsb3QlM0QlMjIxNjk0OTc1MjIyJTIyJTNFJTNDJTJGaW5zJTNFJTBBJTNDc2NyaXB0JTNFJTBBJTIwJTIwJTIwJTIwJTIwJTI4YWRzYnlnb29nbGUlMjAlM0QlMjB3aW5kb3cuYWRzYnlnb29nbGUlMjAlN0MlN0MlMjAlNUIlNUQlMjkucHVzaCUyOCU3QiU3RCUyOSUzQiUwQSUzQyUyRnNjcmlwdCUzRQ==[/vc_raw_html][/vc_column][/vc_row]

WPCargo Adding of Branches or City on each User

[vc_row][vc_column][/vc_column][/vc_row][vc_row][vc_column width=”1/4″][vc_widget_sidebar sidebar_id=”sidebar_3″][/vc_column][vc_column width=”3/4″][vc_column_text]WPCargo Adding of Branches or City on each User


The first step is to add a new option for Branches


  1. Login to your admin account
  2. On your admin dashboard go to Settings > Branch/Outlet Code
    You can add more option for Branch or Outlet by click Add Button
  3. For Adding of City Code, It is the same process with adding of Branches, First you will go to Settings > City Code

  4. After adding more option on Branches or City Code we can now assign it to users. First we need to go on Users > Edit Users then choose a user that you created to assign on the branch or City Code by clicking edit
  5. At the bottom of the page at the WPCargo Set Location section you can now assign the user on which Branch or City Code


  6. After assigning a user please click Edit Users button to save the data

[/vc_column_text][vc_raw_html]JTNDc2NyaXB0JTIwYXN5bmMlMjBzcmMlM0QlMjIlMkYlMkZwYWdlYWQyLmdvb2dsZXN5bmRpY2F0aW9uLmNvbSUyRnBhZ2VhZCUyRmpzJTJGYWRzYnlnb29nbGUuanMlMjIlM0UlM0MlMkZzY3JpcHQlM0UlMEElM0NpbnMlMjBjbGFzcyUzRCUyMmFkc2J5Z29vZ2xlJTIyJTBBJTIwJTIwJTIwJTIwJTIwc3R5bGUlM0QlMjJkaXNwbGF5JTNBYmxvY2slM0IlMjB0ZXh0LWFsaWduJTNBY2VudGVyJTNCJTIyJTBBJTIwJTIwJTIwJTIwJTIwZGF0YS1hZC1sYXlvdXQlM0QlMjJpbi1hcnRpY2xlJTIyJTBBJTIwJTIwJTIwJTIwJTIwZGF0YS1hZC1mb3JtYXQlM0QlMjJmbHVpZCUyMiUwQSUyMCUyMCUyMCUyMCUyMGRhdGEtYWQtY2xpZW50JTNEJTIyY2EtcHViLTA1MDY1Mzg0MjY0NTY4NzclMjIlMEElMjAlMjAlMjAlMjAlMjBkYXRhLWFkLXNsb3QlM0QlMjIxNjk0OTc1MjIyJTIyJTNFJTNDJTJGaW5zJTNFJTBBJTNDc2NyaXB0JTNFJTBBJTIwJTIwJTIwJTIwJTIwJTI4YWRzYnlnb29nbGUlMjAlM0QlMjB3aW5kb3cuYWRzYnlnb29nbGUlMjAlN0MlN0MlMjAlNUIlNUQlMjkucHVzaCUyOCU3QiU3RCUyOSUzQiUwQSUzQyUyRnNjcmlwdCUzRQ==[/vc_raw_html][/vc_column][/vc_row]

How to update your date format in WPCargo

[vc_row][vc_column][/vc_column][/vc_row][vc_row][vc_column width=”1/4″][vc_widget_sidebar sidebar_id=”sidebar_3″ title=”Get Started”][/vc_column][vc_column width=”3/4″][vc_column_text]

How to update your date format WPCargo

WPCargo is using default WordPress General Settings to update the date  and time format of your  WPCargo Custom Field addons, WPCargo Shipping History addons, WPCargo Import and Export addons and  track result .

To modify the format go to  Settings » General  page in WordPress admin area and scroll down to Date Format.

Chose your desire format  if there is none in the choices in screenshot below then you need to custom.

Click this link to view more about the documentation on date and time formatting.

[/vc_column_text][vc_raw_html]JTNDc2NyaXB0JTIwYXN5bmMlMjBzcmMlM0QlMjIlMkYlMkZwYWdlYWQyLmdvb2dsZXN5bmRpY2F0aW9uLmNvbSUyRnBhZ2VhZCUyRmpzJTJGYWRzYnlnb29nbGUuanMlMjIlM0UlM0MlMkZzY3JpcHQlM0UlMEElM0NpbnMlMjBjbGFzcyUzRCUyMmFkc2J5Z29vZ2xlJTIyJTBBJTIwJTIwJTIwJTIwJTIwc3R5bGUlM0QlMjJkaXNwbGF5JTNBYmxvY2slM0IlMjB0ZXh0LWFsaWduJTNBY2VudGVyJTNCJTIyJTBBJTIwJTIwJTIwJTIwJTIwZGF0YS1hZC1sYXlvdXQlM0QlMjJpbi1hcnRpY2xlJTIyJTBBJTIwJTIwJTIwJTIwJTIwZGF0YS1hZC1mb3JtYXQlM0QlMjJmbHVpZCUyMiUwQSUyMCUyMCUyMCUyMCUyMGRhdGEtYWQtY2xpZW50JTNEJTIyY2EtcHViLTA1MDY1Mzg0MjY0NTY4NzclMjIlMEElMjAlMjAlMjAlMjAlMjBkYXRhLWFkLXNsb3QlM0QlMjIxNjk0OTc1MjIyJTIyJTNFJTNDJTJGaW5zJTNFJTBBJTNDc2NyaXB0JTNFJTBBJTIwJTIwJTIwJTIwJTIwJTI4YWRzYnlnb29nbGUlMjAlM0QlMjB3aW5kb3cuYWRzYnlnb29nbGUlMjAlN0MlN0MlMjAlNUIlNUQlMjkucHVzaCUyOCU3QiU3RCUyOSUzQiUwQSUzQyUyRnNjcmlwdCUzRQ==[/vc_raw_html][/vc_column][/vc_row]

Email Settings

[vc_row][vc_column][/vc_column][/vc_row][vc_row][vc_column width=”1/4″][vc_widget_sidebar sidebar_id=”sidebar_3″ title=”Get Started”][/vc_column][vc_column width=”3/4″][vc_column_text]

Email Settings

This add-ons will allow the shipper & receiver to  notify when their is update in the shipment.

To get started, go to WPCargo > Email Settings.

WPCargo Message Tags
You can use tag with in the input fields to convert it dynamically.

Example Merge Tags

{wpcargo_tracking_number} = Tracking Number
{shipper_email} = Shipper Email
{receiver_email} = Receiver Email
{shipper_phone} = Shipper Phone
{receiver_phone} = Receiver Phone
{admin_email} = Admin Email
{shipper_name} = Name of the Shipper
{receiver_name} = Name of the Receiver
{status} = Shipment Status
{site_name} = Website Name
{site_url} = Website URL

Activate Email?
Enable or disable email notification to shipper or receiver everytime the shipment updated.

Headers
Add your domain email where the email came from. Ex. info@domain.com , where domain.com is where your domain name otherwise it will rejected and sometimes it will send to spam.

For Example your domain is wpcargo.com you can use WPCargo <do-not-reply@wpcargo.com>

Mail To
Receiver of the notification. Ex: {shipper_email}, {receiver_email}

Subject
Subject of the notification. Ex: WPCargo  Delivery  –  Your shipment is now in {status}

Message Content
Customized your own message for the client on email.

Footer

You can customized your own footer on email.

[/vc_column_text][vc_column_text]

This will be the sample output on your email

[/vc_column_text][vc_raw_html]JTNDc2NyaXB0JTIwYXN5bmMlMjBzcmMlM0QlMjIlMkYlMkZwYWdlYWQyLmdvb2dsZXN5bmRpY2F0aW9uLmNvbSUyRnBhZ2VhZCUyRmpzJTJGYWRzYnlnb29nbGUuanMlMjIlM0UlM0MlMkZzY3JpcHQlM0UlMEElM0NpbnMlMjBjbGFzcyUzRCUyMmFkc2J5Z29vZ2xlJTIyJTBBJTIwJTIwJTIwJTIwJTIwc3R5bGUlM0QlMjJkaXNwbGF5JTNBYmxvY2slM0IlMjB0ZXh0LWFsaWduJTNBY2VudGVyJTNCJTIyJTBBJTIwJTIwJTIwJTIwJTIwZGF0YS1hZC1sYXlvdXQlM0QlMjJpbi1hcnRpY2xlJTIyJTBBJTIwJTIwJTIwJTIwJTIwZGF0YS1hZC1mb3JtYXQlM0QlMjJmbHVpZCUyMiUwQSUyMCUyMCUyMCUyMCUyMGRhdGEtYWQtY2xpZW50JTNEJTIyY2EtcHViLTA1MDY1Mzg0MjY0NTY4NzclMjIlMEElMjAlMjAlMjAlMjAlMjBkYXRhLWFkLXNsb3QlM0QlMjIxNjk0OTc1MjIyJTIyJTNFJTNDJTJGaW5zJTNFJTBBJTNDc2NyaXB0JTNFJTBBJTIwJTIwJTIwJTIwJTIwJTI4YWRzYnlnb29nbGUlMjAlM0QlMjB3aW5kb3cuYWRzYnlnb29nbGUlMjAlN0MlN0MlMjAlNUIlNUQlMjkucHVzaCUyOCU3QiU3RCUyOSUzQiUwQSUzQyUyRnNjcmlwdCUzRQ==[/vc_raw_html][/vc_column][/vc_row]

Shortcodes included with WPCargo Track & Trace

[vc_row][vc_column][/vc_column][/vc_row][vc_row][vc_column width=”1/4″][vc_widget_sidebar sidebar_id=”sidebar_3″ title=”Get Started”][/vc_column][vc_column width=”3/4″][vc_column_text]

Shortcodes included with WPCargo Track & Trace

 WPCargo comes  with several  shortcode that you can insert it in your page.


WPCargo Track & Trace

Enter the Consignment No.

Ex: 12345

– single page tracking form  + result

Enter the Consignment No.

Ex: 12345

– generate tracking form
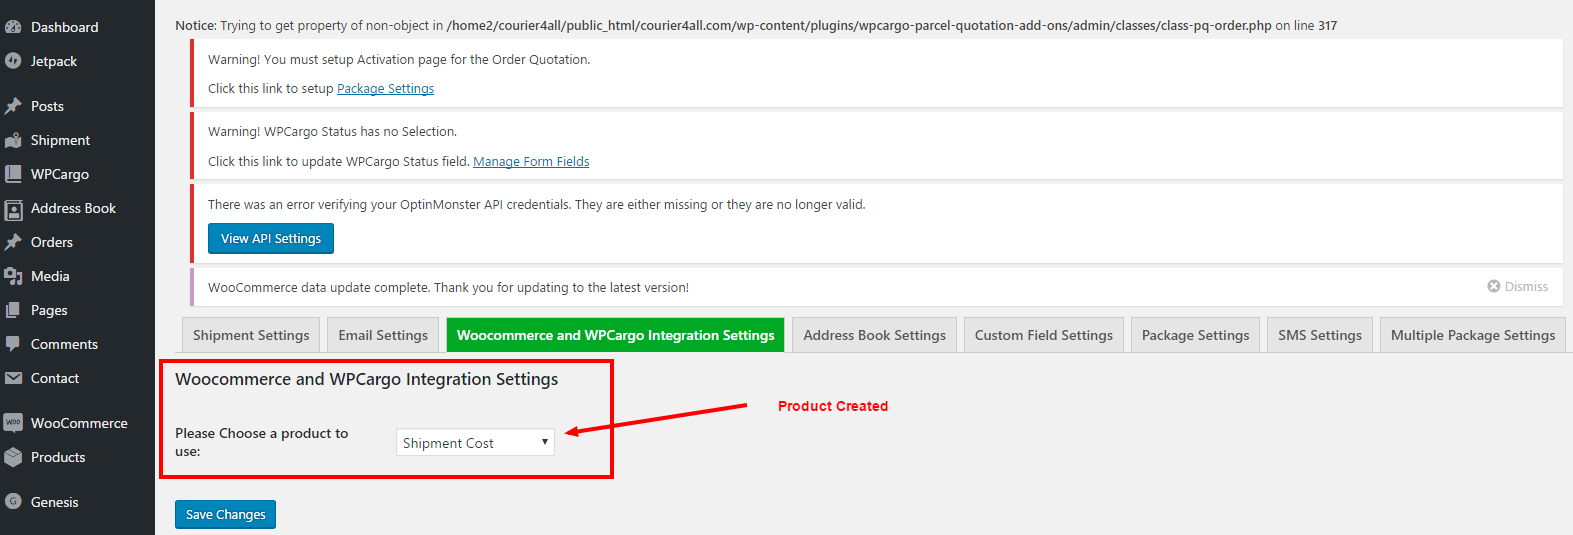
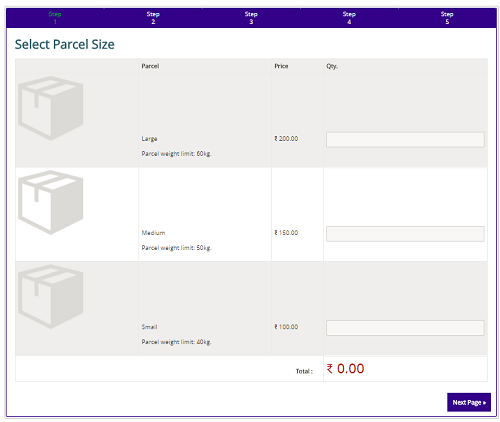
Enter the Consignment No.

Ex: 12345

Generate separate result in  separate page[/vc_column_text][dt_fancy_title title=”WPCargo Pick-up Management Add-ons” title_size=”h2″ title_color=”custom” custom_title_color=”#000000″][vc_column_text css=”.vc_custom_1513240341536{margin-top: 20px !important;}”][wpcargo-pick-up-management] – Online booking form where you can  chose shipment cost 

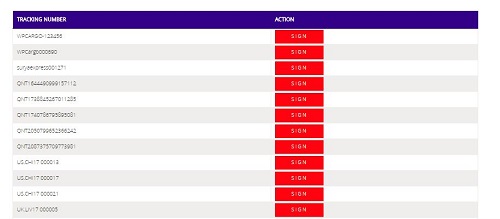
[/vc_column_text][dt_fancy_title title=”WPCargo Proof of Delivery Add-ons ” title_size=”h2″ title_color=”custom” custom_title_color=”#000000″][vc_column_text css=”.vc_custom_1513240359311{margin-top: 20px !important;}”][wpc_driver_accounts] –  List of shipment assigned to a driver

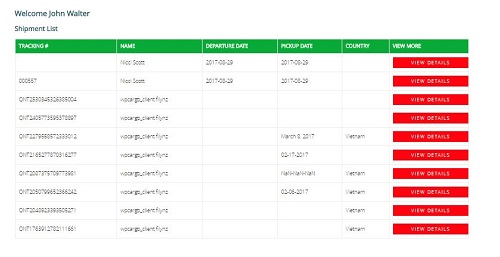
[/vc_column_text][dt_fancy_title title=”WPCargo Client Account Add-ons ” title_size=”h2″ title_color=”custom” custom_title_color=”#000000″][vc_column_text css=”.vc_custom_1513240409025{margin-top: 20px !important;}”] –  List of shipment created or booked by customers

[/vc_column_text][dt_fancy_title title=” WPCargo Parcel Quotation Add-ons” title_size=”h2″ title_color=”custom” custom_title_color=”#000000″][vc_column_text css=”.vc_custom_1519053983383{margin-top: 20px !important;}”][wpc-pq-dashboard orderpageid=”ID of Order page” viewpageid=”ID of View Page” updatepageid=”ID of Update Page”] –
To view pending quotes, current orders and order history .“orderpageid” parameter will redirect to page where the “[wpc-pq dashboardpageid=”ID of main Page”]” shorcode  is added.” ” viewpageid” parameter will redirect to page where the “[wpc-pq-view]” shortcode is added. “updatepageid” parameter will redirect to page where the “[wpc-pq-update]” is added.

[/vc_column_text][dt_fancy_title title=”WPCargo Address Book Add-ons” title_size=”h2″ title_color=”custom” custom_title_color=”#000000″][vc_column_text css=”.vc_custom_1513240474763{margin-top: 20px !important;}”][wpc-pq-book-address] – To create and list of shipper book address and receiver book address.

[/vc_column_text][dt_fancy_title title=”WPCargo Shipment Container Add-ons” title_size=”h2″ title_color=”custom” custom_title_color=”#000000″][vc_column_text css=”.vc_custom_1513240388504{margin-top: 20px !important;}”][wpcargo-container-track-form pageredirect=”page_id”] – To locate or track the container no. and view where “pageredirect” parameter will redirect to page where the “[wpcargo-container-track-result]” is added.

[wpcargo-container-track-result] – This will receive the result of “[wpcargo-container-track-form].

[/vc_column_text][vc_raw_html]JTNDc2NyaXB0JTIwYXN5bmMlMjBzcmMlM0QlMjIlMkYlMkZwYWdlYWQyLmdvb2dsZXN5bmRpY2F0aW9uLmNvbSUyRnBhZ2VhZCUyRmpzJTJGYWRzYnlnb29nbGUuanMlMjIlM0UlM0MlMkZzY3JpcHQlM0UlMEElM0NpbnMlMjBjbGFzcyUzRCUyMmFkc2J5Z29vZ2xlJTIyJTBBJTIwJTIwJTIwJTIwJTIwc3R5bGUlM0QlMjJkaXNwbGF5JTNBYmxvY2slM0IlMjB0ZXh0LWFsaWduJTNBY2VudGVyJTNCJTIyJTBBJTIwJTIwJTIwJTIwJTIwZGF0YS1hZC1sYXlvdXQlM0QlMjJpbi1hcnRpY2xlJTIyJTBBJTIwJTIwJTIwJTIwJTIwZGF0YS1hZC1mb3JtYXQlM0QlMjJmbHVpZCUyMiUwQSUyMCUyMCUyMCUyMCUyMGRhdGEtYWQtY2xpZW50JTNEJTIyY2EtcHViLTA1MDY1Mzg0MjY0NTY4NzclMjIlMEElMjAlMjAlMjAlMjAlMjBkYXRhLWFkLXNsb3QlM0QlMjIxNjk0OTc1MjIyJTIyJTNFJTNDJTJGaW5zJTNFJTBBJTNDc2NyaXB0JTNFJTBBJTIwJTIwJTIwJTIwJTIwJTI4YWRzYnlnb29nbGUlMjAlM0QlMjB3aW5kb3cuYWRzYnlnb29nbGUlMjAlN0MlN0MlMjAlNUIlNUQlMjkucHVzaCUyOCU3QiU3RCUyOSUzQiUwQSUzQyUyRnNjcmlwdCUzRQ==[/vc_raw_html][/vc_column][/vc_row]

Pick-up Management Add-ons

[vc_row][vc_column width=”1/4″][vc_widget_sidebar sidebar_id=”sidebar_3″][/vc_column][vc_column width=”3/4″][vc_column_text]Allows you to manage the orders of the client and also for the client to purchase/order online. Note: This needs WPCago and WPCargo Custom Field Add-ons plugin Installed.[/vc_column_text][dt_fancy_title title=”How to Install WPCargo Pick-up Management Add-ons Plugin” title_size=”h4″ title_color=”custom” separator_style=”double” custom_title_color=”#333333″][vc_column_text css=”.vc_custom_1471246622863{margin-top: 35px !important;margin-bottom: 35px !important;}”]

Cpanel Installation.

  1. Purchase the plugin in WPCargo.com
  2. Upload wpcargo-pick-up-management-addons.zip to the /wp-content/plugins/ directory or go to the wordpress site admin plugins page and upload the zip file
  3. Extract the plugin zip file
  4. Go to the site admin plugins page
  5. Activate the plugin

WordPress Admin Installation

  1. Purchase the plugin in WPCargo.com
  2. Go to the admin plugin > Add new
  3. Upload plugin wpcargo-pick-up-management-addons.zip file
  4. Activate the plugin in the plugin list

[/vc_column_text][dt_fancy_title title=”How to Activate WPCargo Pick-up Management Add-ons License” title_size=”h4″ title_color=”custom” separator_style=”double” custom_title_color=”#333333″][vc_column_text css=”.vc_custom_1471246873632{margin-top: 35px !important;margin-bottom: 35px !important;}”]

  1. Go to the Site admin dashboard
  2. Visit WPcargo > WPTaskforce
  3. Add the license in the “License Key” column
  4. Tick the “Activate” button to activate

[/vc_column_text][vc_single_image image=”1975″ img_size=”large” alignment=”center” style=”vc_box_rounded” onclick=”link_image” lazy_loading=”true”][dt_fancy_title title=”How to use WPCargo Pick-up Management Add-ons” title_align=”left” title_size=”h4″ title_color=”custom” separator_style=”double” custom_title_color=”#333333″][vc_column_text css=”.vc_custom_1471249633246{margin-top: 35px !important;margin-bottom: 35px !important;}”]Before using the WPCargo Pick-up management add-ons, you need to create custom fields for your pick-up management fields.[/vc_column_text][dt_fancy_title title=”How to Create Custom Field for Pick-up Management” title_size=”h4″ title_color=”custom” custom_title_color=”#333333″][vc_column_text css=”.vc_custom_1471249121955{margin-top: 35px !important;margin-bottom: 35px !important;}”]Note: This needs WPCargo Custom Field add-ons to be activated.

  1. Go to the Admin menu WPCargo > Manage Form Fields (See figure 2.1)
  2. Click “Add form field” tab to add New Form Field
  3. Fill-up all the fields requirement for the form field. (See figure 2.2)
    • Field Type – Type of input field.
    • Field Label – Label on the input field.
    • Field Description – Description of the input field.
    • Field Options for select lists, radio buttons and checkboxes – This are the option of the input field (Note: This will be fillable when the selected Field Type is select, multiselect, radio, checkbox, Each selection must be sepated with comma (,) ).
    • Field meta key – Name of the input field and this will be the name of the post meta key
    • Is Field required? – Add “required” attribute to the input field.
    • What Section do you want to display? – Assign the input field which section to be added
    • Do you want to display on search form? – Select if you want the field to be added in the “Track Form”
    • Is field required on search form? – Add “required” attribute to the form field in the “Track Form”
    • Do you want to display it on result page? – Select if you want the field to be display in the “Track Form” result
    • Do you want to display it on pick-up management page? – Select if the form field want to add in the “Pick-up Management” form field.
  1. Click “Add Field”

[/vc_column_text][vc_row_inner][vc_column_inner width=”1/2″][vc_single_image image=”1978″ img_size=”full” add_caption=”yes” alignment=”center” style=”vc_box_rounded” onclick=”link_image” title=”Figure 2.1″ lazy_loading=”true”][/vc_column_inner][vc_column_inner width=”1/2″][vc_single_image image=”1979″ img_size=”full” add_caption=”yes” alignment=”center” style=”vc_box_rounded” onclick=”link_image” title=”Figure 2.2″ lazy_loading=”true”][/vc_column_inner][/vc_row_inner][vc_column_text css=”.vc_custom_1471248170668{margin-top: 35px !important;margin-bottom: 35px !important;}”]How to “Edit” the create form Field

  1. Go to the Admin menu WPCargo > Manage Form Fields
  2. Click “Add form field” tab to add Form Field List
  3. Hover on the Field label and click the “Edit” hyper link
  4. Edit the Field form that you want to edit
  5. Click the “Edit Field” button to save the changes

How to “Delete” the create form field

  1. Go to the Admin menu WPCargo > Manage Form Fields
  2. Click “Add form field” tab to add Form Field List
  3. Hover on the Field label and click the “Delete” hyper link

[/vc_column_text][dt_fancy_title title=”How to use plugin Shortcode” title_size=”h4″ title_color=”custom” custom_title_color=”#333333″][vc_column_text css=”.vc_custom_1471248306389{margin-top: 35px !important;margin-bottom: 35px !important;}”]

  1. Create a new page for your Pick-up Management Page
  2. Add [wpcargo-pick-up-management] shortcode for the content.

[/vc_column_text][dt_fancy_title title=”How to Set-up Plugin Parcel” title_size=”h4″ title_color=”custom” custom_title_color=”#333333″][vc_column_text css=”.vc_custom_1471248406908{margin-top: 35px !important;margin-bottom: 35px !important;}”]

  1. Go to the Admin menu Parcels > Add New
  2. Fill-up all the fields for the parcel information
  3. Click Publish to save parcel

[/vc_column_text][dt_fancy_title title=”How to Set-up Parcel Price Currency and Title Prefix” title_size=”h4″ title_color=”custom” separator_style=”double” custom_title_color=”#333333″][vc_column_text css=”.vc_custom_1471249150354{margin-top: 35px !important;margin-bottom: 35px !important;}”]

  1. Go to the Admin menu > Parcel > Pick-up Management Settings
  2. Fill-up all field based on you requirement (See Figure 3.1)
    • Currency – Select currency symbol for the Parcel amount
    • WPCargo Title Prefix – Title prefix for the Pick-up Management Form submission
  3. Click “Save Settings” button to save

[/vc_column_text][vc_single_image image=”1981″ img_size=”full” add_caption=”yes” alignment=”center” onclick=”link_image” title=”Figure 3.1″ lazy_loading=”true”][dt_fancy_title title=”How to View Pick-up Management Information” title_size=”h4″ title_color=”custom” separator_style=”double” custom_title_color=”#333333″][vc_column_text css=”.vc_custom_1471249164168{margin-top: 35px !important;margin-bottom: 35px !important;}”]

  1. Go to the Admin menu > Parcel > Parcel Orders
  2. Click the “Parcel order” you want to view (See Figure 4.1)
  3. Click the “Print Receipt” at the left side of the page to print the parcel order Information

[/vc_column_text][vc_single_image image=”1983″ img_size=”full” add_caption=”yes” alignment=”center” style=”vc_box_rounded” onclick=”link_image” title=”Figure 4.1″ lazy_loading=”true”][/vc_column][/vc_row]