Balikbayan Box Management Addon – Empty Box Delivery and Pickup Management of Balikbayan Box System

Regardless of the new conventions of gift-giving via the internet, nothing is more personal than a huge, easy-to-assemble, and robust cardboard box, called the Balikbayan box, that is loaded with various products prepared for loved ones. Actually, this has come to represent the hard labor of Filipino migrants who want to help their family and friends back home.

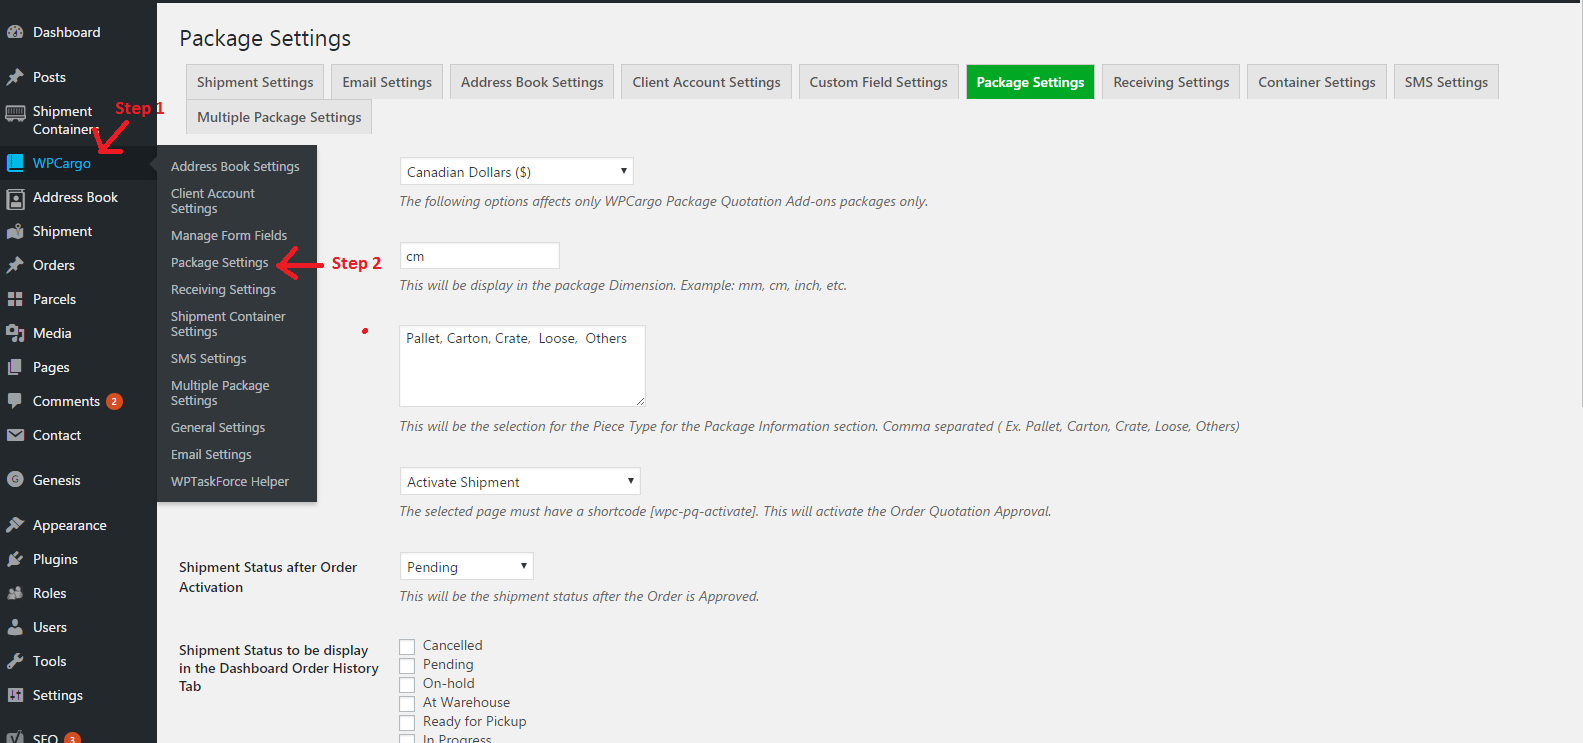
Nevertheless, many businesses in the freight forwarding industry, such as the balikbayan box, still use pen and paper, and it takes an immense amount of time and effort to achieve the desired results. Thus, it causes a toll and an unsystematic process in your operation. Having said that, WPCargo launched the Balikbayan Box Management Addon, which integrates, optimizes, and streamlines your business operations for greater efficiency. It allows you to establish a rate list for items, add origin and destination locations, and instantly calculate your balikbayan rates. Also, this plugin manages to automate and synchronize every element of your consolidation process for your and your employees’ convenience. The add-on includes customizable fields and can be linked with any page builder via the provided shortcode [wpcsb_box_rates].

Particularly, this is tailored to the preferences of your clientele and delivers a lower cost for your company.

Features:

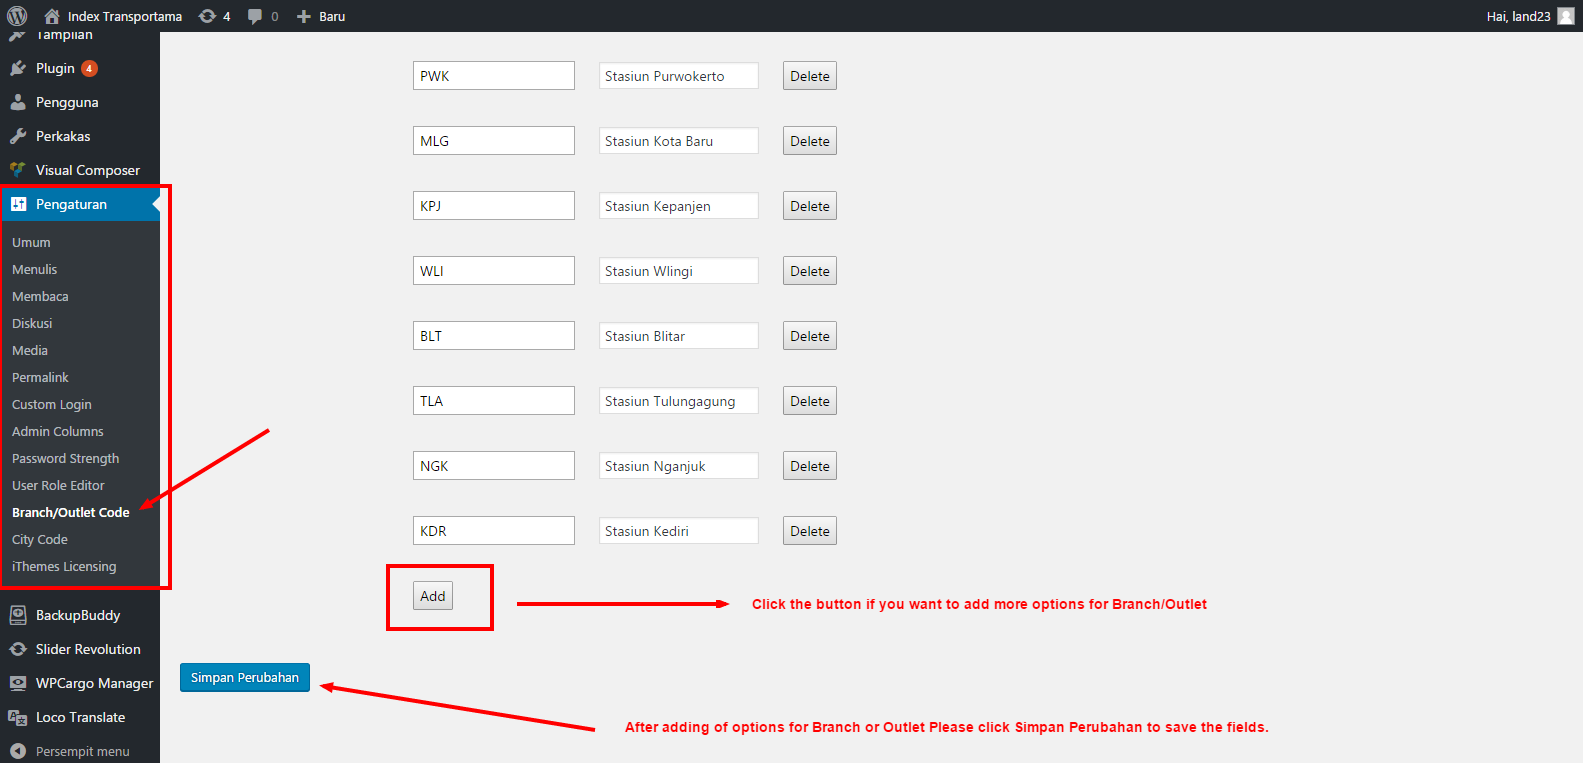
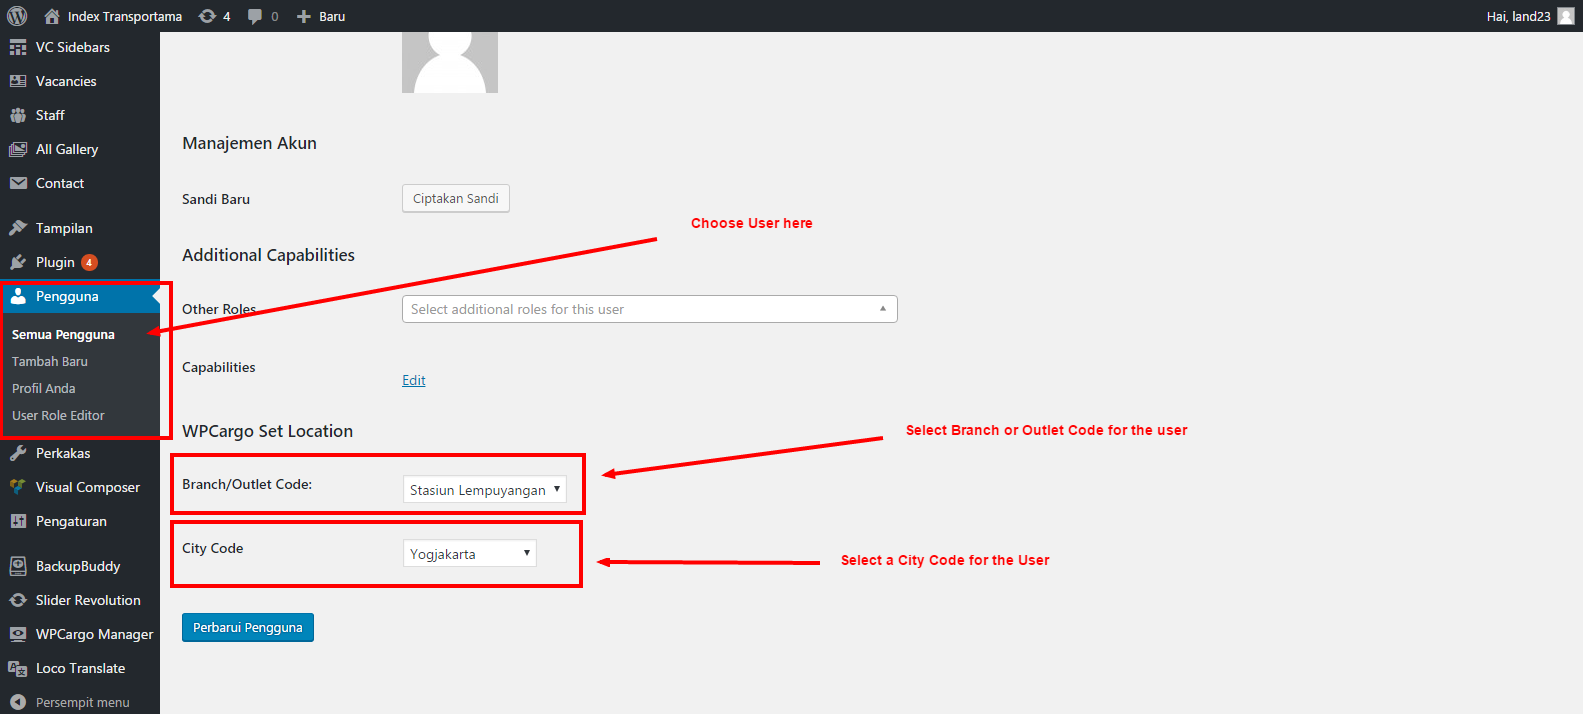
  • Location- The admin can add origin and destination in the WordPress admin.
  • Empty Boxes Booking
  • Auto-populate the product list based on the shipment type selected.
  • Auto-compute basic charges for the selected box product(s)
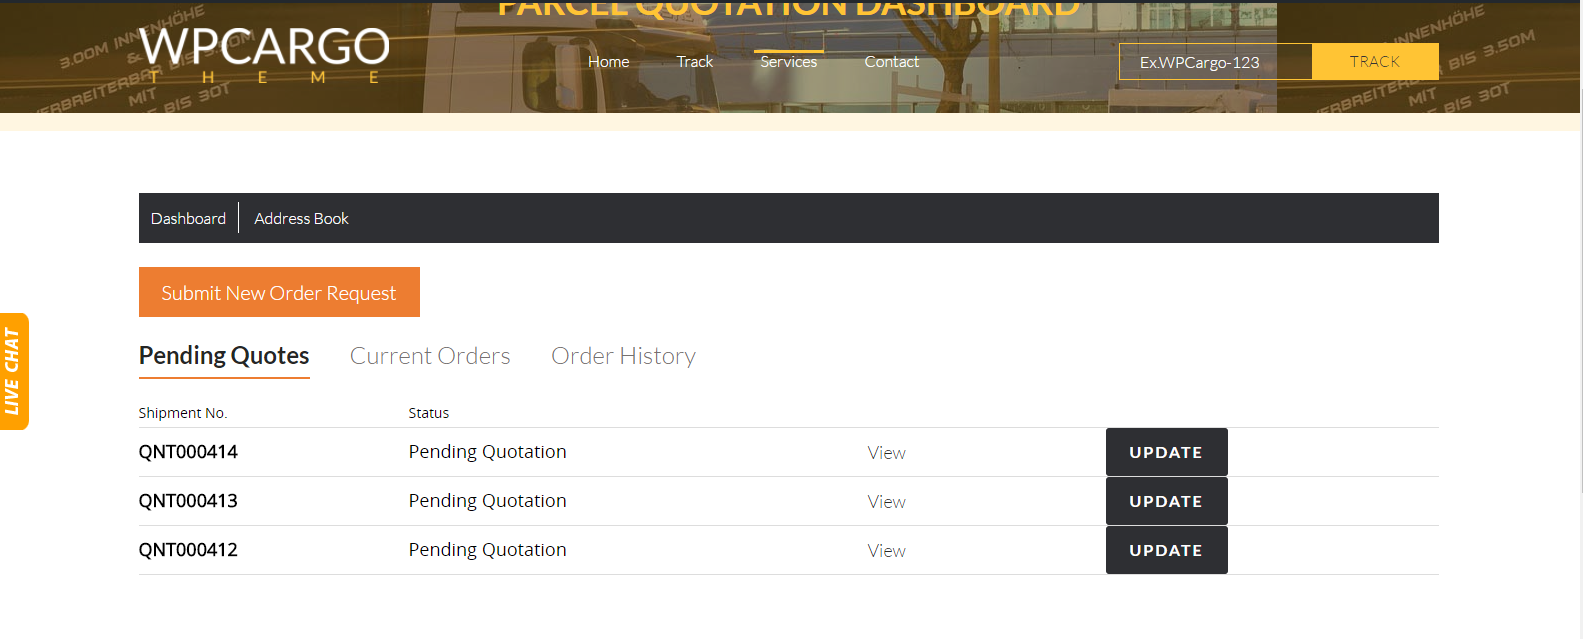
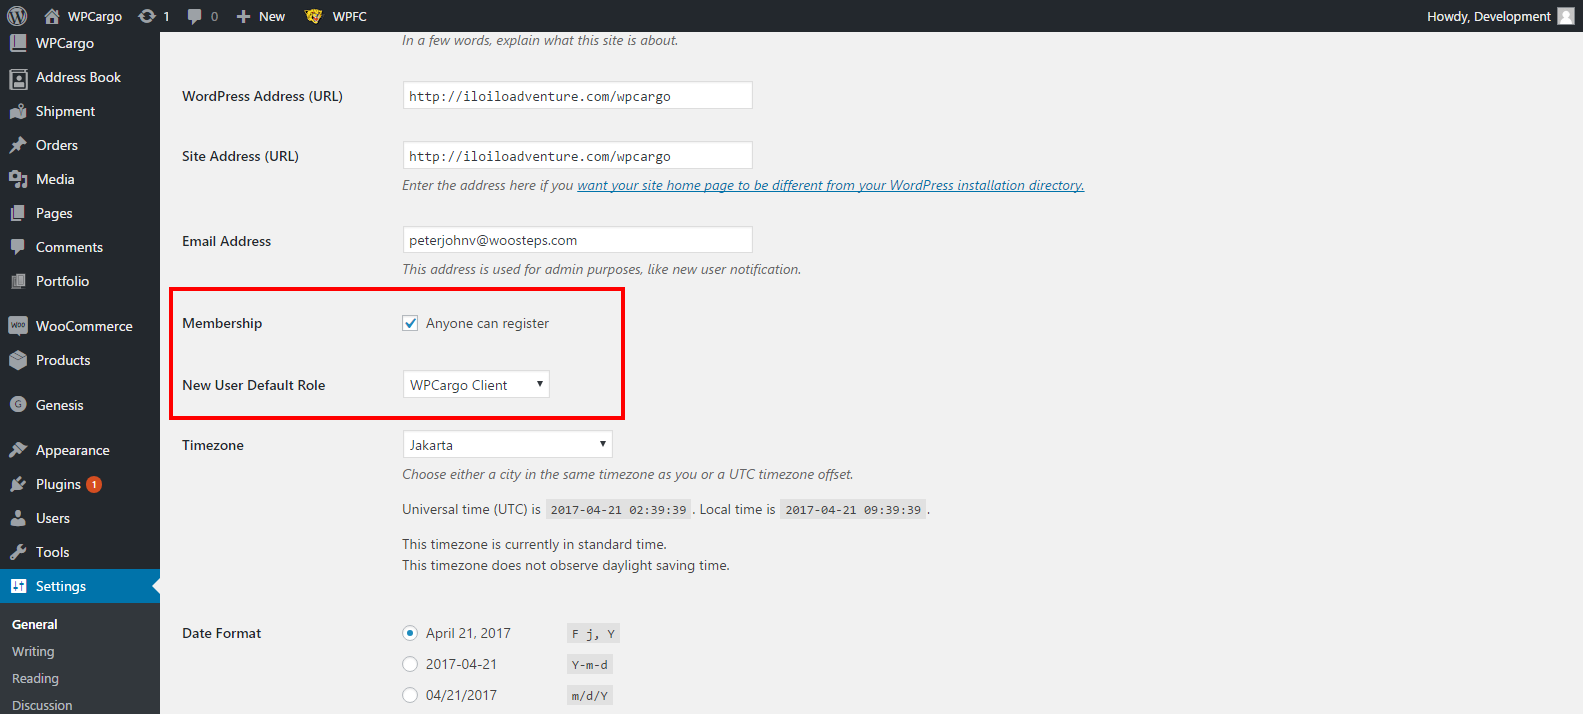
  • Allows clients to book Balikbayan Box without the need to login.
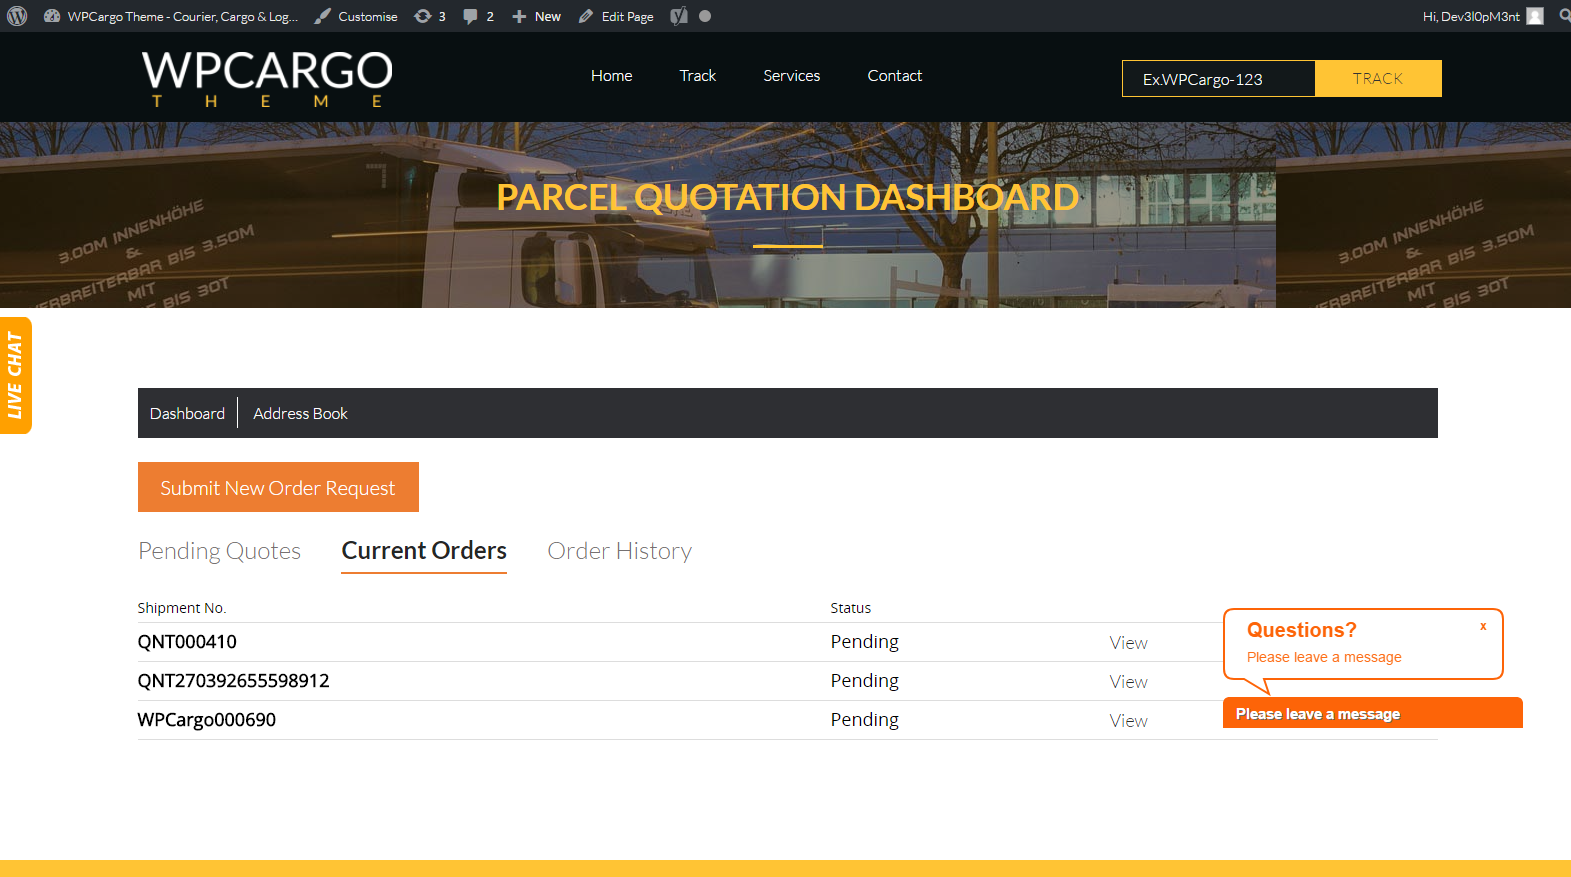
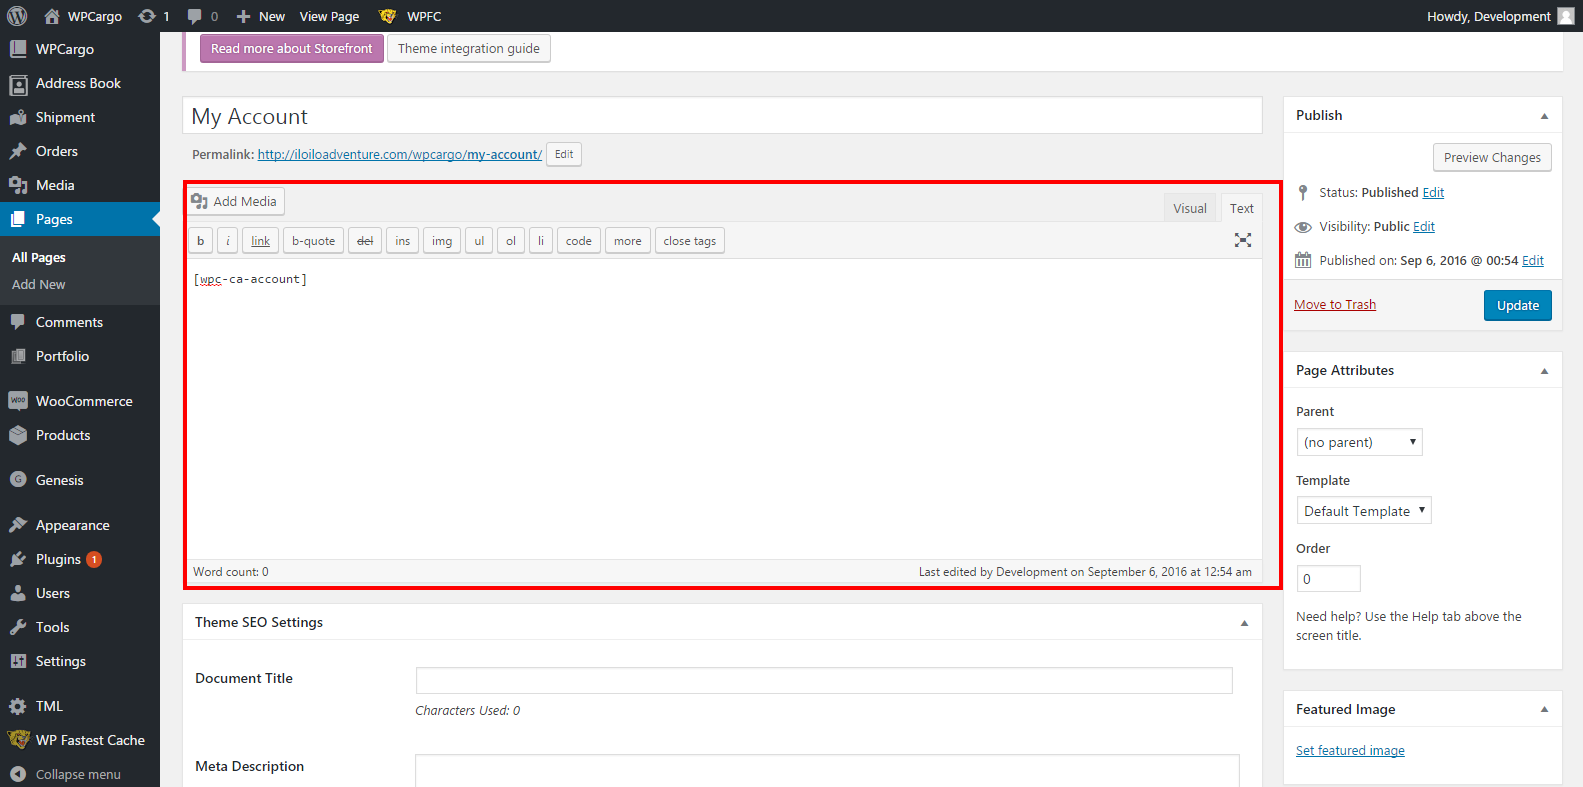
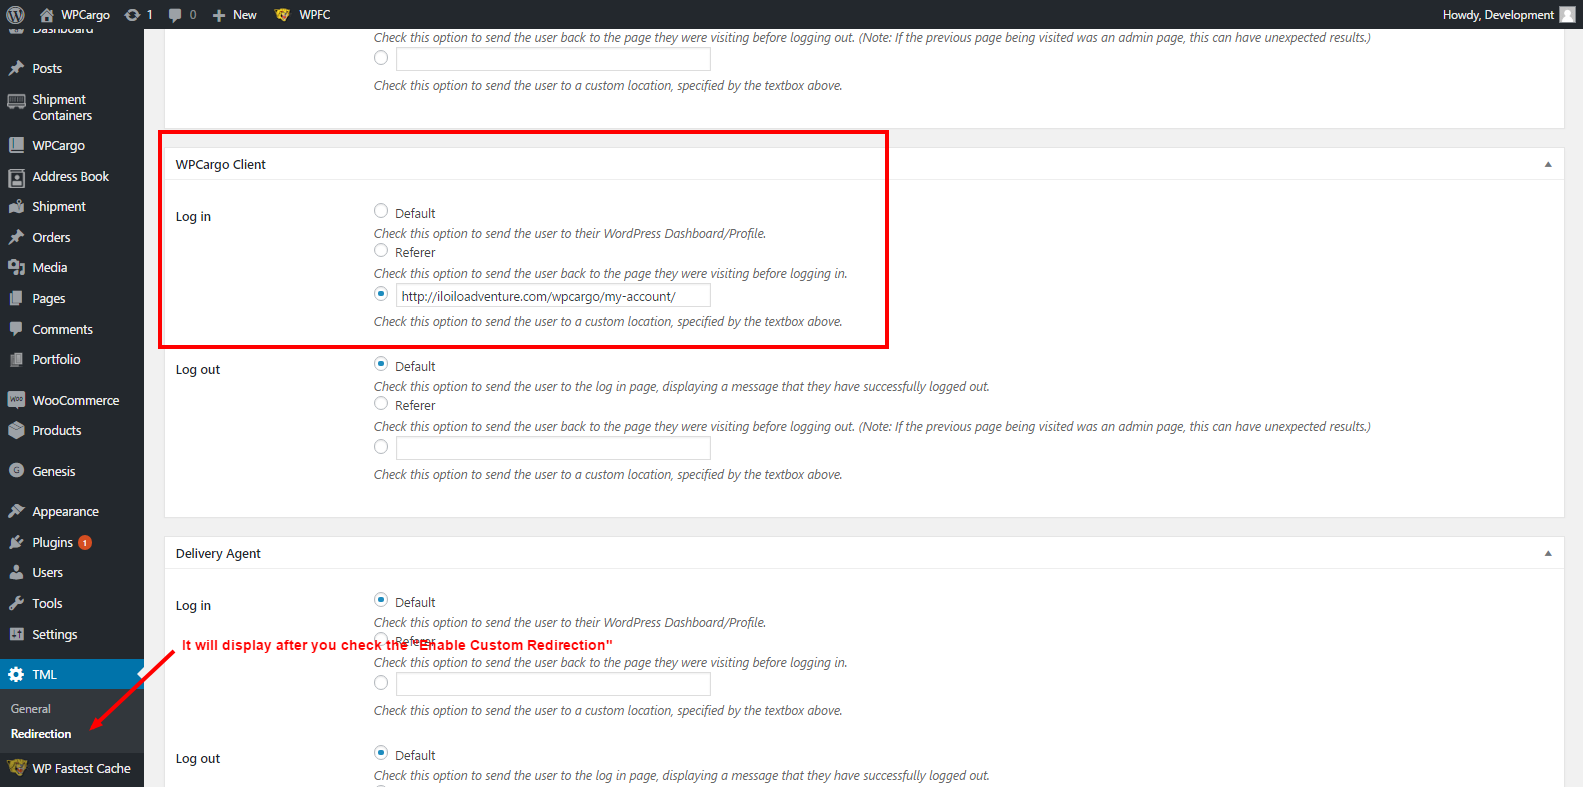
  • Allows the frontend dashboard to display the current status tracker if the client is logged in.
  • The booking template is customizable.
  • Balikbayan Box Rates
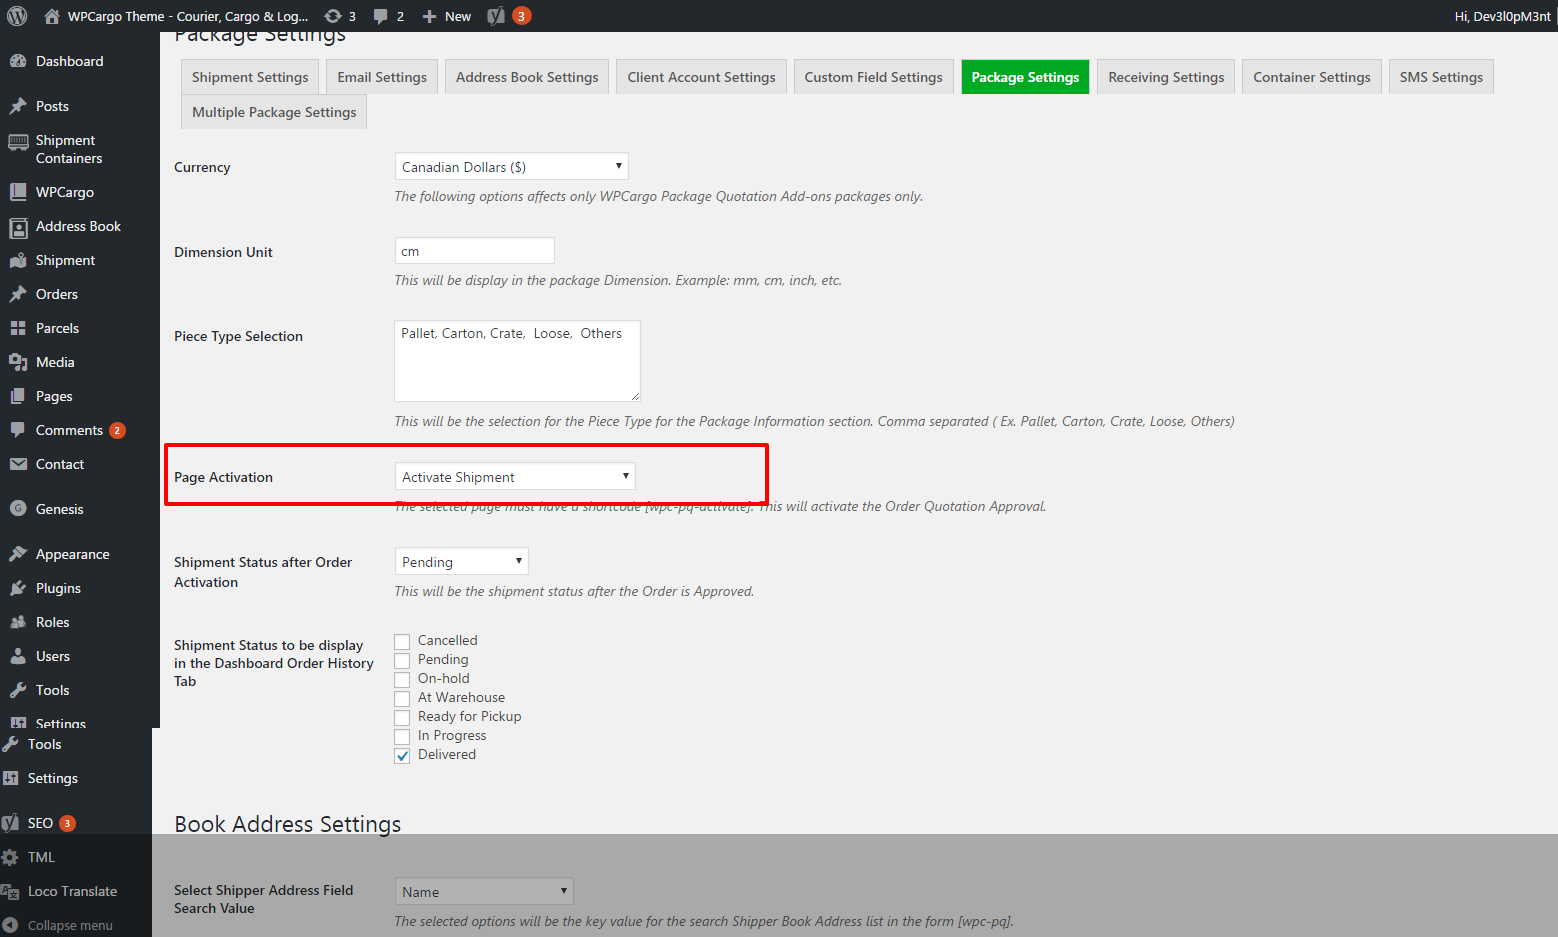
  • The admin can set box type and shipment type through settings.
  • The admin can add rates for each box type, shipment type, and location
  • Allows Admin and employees to update additional charges and discounts.
  • Rate Computation
    • deducts the unclaimed empty box deposit.
    • customizable additional charges and discounts
  • Notifications
    • Send an email notification on a status update.
    • SMS Notification on status update ( if SMS Addon is enabled)

Allow other roles to access Frontend Dashboard

To allow other roles to access and update using dashboard you will need to go to WPCargo -> Frontend Dashboard settings and look for Access Frontend Dashboard Roles and Update Shipments Roles

How to enable the user to update shipping history

[vc_row][vc_column][/vc_column][/vc_row][vc_row][vc_column width=”1/4″][vc_widget_sidebar sidebar_id=”sidebar_3″ title=”Get Started”][/vc_column][vc_column width=”3/4″][vc_column_text]

Getting Started

We have several guides to help you get started with the WPCargo Track & Trace Plugin.

These guides cover:


Once you’ve finished setting up the system, you can start using it.[/vc_column_text][vc_raw_html]JTNDc2NyaXB0JTIwYXN5bmMlMjBzcmMlM0QlMjIlMkYlMkZwYWdlYWQyLmdvb2dsZXN5bmRpY2F0aW9uLmNvbSUyRnBhZ2VhZCUyRmpzJTJGYWRzYnlnb29nbGUuanMlMjIlM0UlM0MlMkZzY3JpcHQlM0UlMEElM0NpbnMlMjBjbGFzcyUzRCUyMmFkc2J5Z29vZ2xlJTIyJTBBJTIwJTIwJTIwJTIwJTIwc3R5bGUlM0QlMjJkaXNwbGF5JTNBYmxvY2slM0IlMjB0ZXh0LWFsaWduJTNBY2VudGVyJTNCJTIyJTBBJTIwJTIwJTIwJTIwJTIwZGF0YS1hZC1sYXlvdXQlM0QlMjJpbi1hcnRpY2xlJTIyJTBBJTIwJTIwJTIwJTIwJTIwZGF0YS1hZC1mb3JtYXQlM0QlMjJmbHVpZCUyMiUwQSUyMCUyMCUyMCUyMCUyMGRhdGEtYWQtY2xpZW50JTNEJTIyY2EtcHViLTA1MDY1Mzg0MjY0NTY4NzclMjIlMEElMjAlMjAlMjAlMjAlMjBkYXRhLWFkLXNsb3QlM0QlMjIxNjk0OTc1MjIyJTIyJTNFJTNDJTJGaW5zJTNFJTBBJTNDc2NyaXB0JTNFJTBBJTIwJTIwJTIwJTIwJTIwJTI4YWRzYnlnb29nbGUlMjAlM0QlMjB3aW5kb3cuYWRzYnlnb29nbGUlMjAlN0MlN0MlMjAlNUIlNUQlMjkucHVzaCUyOCU3QiU3RCUyOSUzQiUwQSUzQyUyRnNjcmlwdCUzRQ==[/vc_raw_html][/vc_column][/vc_row]

How to use WPCargo Parcel Quotation Add-ons shortcodes

[vc_row][vc_column width=”1/3″][vc_widget_sidebar sidebar_id=”sidebar_3″][/vc_column][vc_column width=”2/3″][vc_column_text]

How to use WPCargo Parcel Quotation Add-ons shortcodes

WPCargo Parcel Quotation Add-ons has 6 available shortcodes

  • [wpc-pq-dashboard orderpageid=”pageID” viewpageid=”pageID” updatepageid=”pageID”]
  • [wpc-pq dashboardpageid=”pageID”]
  • [wpc-pq-view]
  • [wpc-pq-update]
  • [wpc-pq-activate]
  • [wpc-pq-book-address]

Shortcodes

[wpc-pq-dashboard orderpageid=”pageID” viewpageid=”pageID” updatepageid=”pageID”]

This plugin shortcode is the dashboard has 3 parameters and accept only with a page ID, this shortcode consider as the plugin main shortcode where the user can view his/her create shipment including the Shipment for Quotation, Current Orders and Order History.


Parameters

orderpageid parameter – Accepts page ID, the purpose of this parameter is for the “Submit New Order Request” button redirection

viewpageid parameter – Accepts page ID,the purpose of this parameter if for the “View” link redirection under the shipment list.

updatepageid – Accepts page ID,the purpose of this parameter if for the “Update” link redirection under the shipment list.

Note: the “Update” link will only display in the shipment table list if the current user logged in role is “WPCargo Agent”.

Tabs

Pending Quotes Tab – Display all the current user logged in shipment that are under pending for quotation, The  user has ability to view and cancel his/her shipment and print.

Current Orders Tab – Display all the current user logged in shipment with shipment status that are not selected in the package setting “Shipment Status to be display in the Dashboard Order History Tab“. In this tab the user can view his/her shipment and print.

Order History Tab – Display all the current user logged in shipment with shipment status that is selected in the package setting “Shipment Status to be display in the Dashboard Order History Tab“. In this tab the user can view his/her shipment and print.

[wpc-pq dashboardpageid=”pageID”]

This plugin shortcode is use for submitting shipment in the site frontend under the user role WPCargo Client role. copy the page ID where this shortcode is used and add it to the wpc-pq-dashboard shortcode under the orderpageid parameter.

This plugin has one parameter dashboardpageid which accept page ID, the purpose of this parameter is to redirect the user to the plugin dashboard page after the shipment order is submitted.

Note: This shortcode is accessible only for the logged in users.

[wpc-pq-view]

This plugin shortcode is use for the shipment viewing. copy the page ID where this shortcode is used and add it to the wpc-pq-dashboard shortcode under the viewpageid parameter.

[wpc-pq-update]

This plugin shortcode is use to update shipment. copy the page ID where this shortcode is used and add it to the wpc-pq-dashboard shortcode under the updatepageid parameter.

[wpc-pq-activate]

This plugin shortcode is use to activate shipment. Add this shortcode to the page where the Package settings “Page Activation” page selected.

[wpc-pq-book-address]

This plugin shortcode is use for the current user logged in Address book page.

[/vc_column_text][vc_raw_html]JTNDc2NyaXB0JTIwYXN5bmMlMjBzcmMlM0QlMjIlMkYlMkZwYWdlYWQyLmdvb2dsZXN5bmRpY2F0aW9uLmNvbSUyRnBhZ2VhZCUyRmpzJTJGYWRzYnlnb29nbGUuanMlMjIlM0UlM0MlMkZzY3JpcHQlM0UlMEElM0NpbnMlMjBjbGFzcyUzRCUyMmFkc2J5Z29vZ2xlJTIyJTBBJTIwJTIwJTIwJTIwJTIwc3R5bGUlM0QlMjJkaXNwbGF5JTNBYmxvY2slM0IlMjB0ZXh0LWFsaWduJTNBY2VudGVyJTNCJTIyJTBBJTIwJTIwJTIwJTIwJTIwZGF0YS1hZC1sYXlvdXQlM0QlMjJpbi1hcnRpY2xlJTIyJTBBJTIwJTIwJTIwJTIwJTIwZGF0YS1hZC1mb3JtYXQlM0QlMjJmbHVpZCUyMiUwQSUyMCUyMCUyMCUyMCUyMGRhdGEtYWQtY2xpZW50JTNEJTIyY2EtcHViLTA1MDY1Mzg0MjY0NTY4NzclMjIlMEElMjAlMjAlMjAlMjAlMjBkYXRhLWFkLXNsb3QlM0QlMjIxNjk0OTc1MjIyJTIyJTNFJTNDJTJGaW5zJTNFJTBBJTNDc2NyaXB0JTNFJTBBJTIwJTIwJTIwJTIwJTIwJTI4YWRzYnlnb29nbGUlMjAlM0QlMjB3aW5kb3cuYWRzYnlnb29nbGUlMjAlN0MlN0MlMjAlNUIlNUQlMjkucHVzaCUyOCU3QiU3RCUyOSUzQiUwQSUzQyUyRnNjcmlwdCUzRQ==[/vc_raw_html][/vc_column][/vc_row]

How to set up WPCargo Parcel Quotation Add-ons

[vc_row][vc_column width=”1/3″][vc_widget_sidebar sidebar_id=”sidebar_3″][/vc_column][vc_column width=”2/3″][vc_column_text]

How to set WPCargo Parcel Quotation add ons

Note: Before using this plugin it is advised to begin in setting up plugin settings 

The following are the procedure on how to setup the plugin

  • Login to your wordpress site and go to admin dashboard.
  • Go to Dashborad > WPCargo > Package settings

  • Fill up all form fields
  • Click “Save Settings” button at the bottom og the page.

Important Reminders:

Currency – The currency to user for the parcel quotation, The following options affects only WPCargo Package Quotation Add-ons packages only.

Dimension Unit – This will be display in the package Dimension. Example: mm, cm, inch, etc.

Piece Type Selection – This will be the selection for the Piece Type for the Package Information section.

Page Activation – This will activate the Order Quotation Approval. The selected page must have a shortcode [wpc-pq-activate].

Shipment Status after Order Activation – This will be the shipment status after the Order is Approved.

Shipment Status to be display in the Dashboard Order History Tab –  Select which shipment status to be display under the History tab, under the plugin dashboard.

Book Address Settings

Select Shipper Address Field Search Value – The selected options will be the key value for the search Shipper Book Address list in the form [wpc-pq].

Select Fields to be display in Shipper Book Address List – The selected options will display in the Shipper Book Address [wpc-pq-book-address] template list table.

Select Receiver Address Field Search Value – The selected options will be the key value for the search Receiver Book Address list in the form [wpc-pq].

Select Fields to be display in Receiver Book Address List – The selected options will display in the Receiver Book Address [wpc-pq-book-address] template list table.

[/vc_column_text][vc_raw_html]JTNDc2NyaXB0JTIwYXN5bmMlMjBzcmMlM0QlMjIlMkYlMkZwYWdlYWQyLmdvb2dsZXN5bmRpY2F0aW9uLmNvbSUyRnBhZ2VhZCUyRmpzJTJGYWRzYnlnb29nbGUuanMlMjIlM0UlM0MlMkZzY3JpcHQlM0UlMEElM0NpbnMlMjBjbGFzcyUzRCUyMmFkc2J5Z29vZ2xlJTIyJTBBJTIwJTIwJTIwJTIwJTIwc3R5bGUlM0QlMjJkaXNwbGF5JTNBYmxvY2slM0IlMjB0ZXh0LWFsaWduJTNBY2VudGVyJTNCJTIyJTBBJTIwJTIwJTIwJTIwJTIwZGF0YS1hZC1sYXlvdXQlM0QlMjJpbi1hcnRpY2xlJTIyJTBBJTIwJTIwJTIwJTIwJTIwZGF0YS1hZC1mb3JtYXQlM0QlMjJmbHVpZCUyMiUwQSUyMCUyMCUyMCUyMCUyMGRhdGEtYWQtY2xpZW50JTNEJTIyY2EtcHViLTA1MDY1Mzg0MjY0NTY4NzclMjIlMEElMjAlMjAlMjAlMjAlMjBkYXRhLWFkLXNsb3QlM0QlMjIxNjk0OTc1MjIyJTIyJTNFJTNDJTJGaW5zJTNFJTBBJTNDc2NyaXB0JTNFJTBBJTIwJTIwJTIwJTIwJTIwJTI4YWRzYnlnb29nbGUlMjAlM0QlMjB3aW5kb3cuYWRzYnlnb29nbGUlMjAlN0MlN0MlMjAlNUIlNUQlMjkucHVzaCUyOCU3QiU3RCUyOSUzQiUwQSUzQyUyRnNjcmlwdCUzRQ==[/vc_raw_html][/vc_column][/vc_row]

WPCargo Parcel Quotation Add-ons Installation

[vc_row][vc_column][/vc_column][/vc_row][vc_row][vc_column width=”1/4″][vc_widget_sidebar sidebar_id=”sidebar_3″ title=”Get Started”][/vc_column][vc_column width=”3/4″][vc_column_text]

WPCargo Parcel Quotation Add-ons Installation

Install WPCargo Parcel Quotation Add-ons

You need to purchase WPCargo Parcel Quotation Add-ons in the WPCargo.com/Purchase page before you can install and use to your WPCargo website.

Note: This plugin requires WPCargo Custom Field Addons installed in your wordpress site.

Download first the WPCargo License Manager in order to install the WPCargo Parcel Quotation Add-ons.

You can download  it here and follow instruction below.

Download the WPCargo License Manager plugin

  • Download the plugin
  • Go to your website
  • Go to: Dashboard > Plugins > Add New > Upload
  • Select the downloaded plugin
  • Install
  • Activate


Download the WPCargo Parcel Quotation Add-ons plugin in the order notification and copy the license key .

  • Download the plugin
  • Go to your website
  • Go to: Dashboard > Plugins > Add New > Upload
  • Select the downloaded plugin
  • Install
  • Activate
  • Add license key in the  WPCargo License Manager
  • Activate license

[/vc_column_text][vc_raw_html]JTNDc2NyaXB0JTIwYXN5bmMlMjBzcmMlM0QlMjIlMkYlMkZwYWdlYWQyLmdvb2dsZXN5bmRpY2F0aW9uLmNvbSUyRnBhZ2VhZCUyRmpzJTJGYWRzYnlnb29nbGUuanMlMjIlM0UlM0MlMkZzY3JpcHQlM0UlMEElM0NpbnMlMjBjbGFzcyUzRCUyMmFkc2J5Z29vZ2xlJTIyJTBBJTIwJTIwJTIwJTIwJTIwc3R5bGUlM0QlMjJkaXNwbGF5JTNBYmxvY2slM0IlMjB0ZXh0LWFsaWduJTNBY2VudGVyJTNCJTIyJTBBJTIwJTIwJTIwJTIwJTIwZGF0YS1hZC1sYXlvdXQlM0QlMjJpbi1hcnRpY2xlJTIyJTBBJTIwJTIwJTIwJTIwJTIwZGF0YS1hZC1mb3JtYXQlM0QlMjJmbHVpZCUyMiUwQSUyMCUyMCUyMCUyMCUyMGRhdGEtYWQtY2xpZW50JTNEJTIyY2EtcHViLTA1MDY1Mzg0MjY0NTY4NzclMjIlMEElMjAlMjAlMjAlMjAlMjBkYXRhLWFkLXNsb3QlM0QlMjIxNjk0OTc1MjIyJTIyJTNFJTNDJTJGaW5zJTNFJTBBJTNDc2NyaXB0JTNFJTBBJTIwJTIwJTIwJTIwJTIwJTI4YWRzYnlnb29nbGUlMjAlM0QlMjB3aW5kb3cuYWRzYnlnb29nbGUlMjAlN0MlN0MlMjAlNUIlNUQlMjkucHVzaCUyOCU3QiU3RCUyOSUzQiUwQSUzQyUyRnNjcmlwdCUzRQ==[/vc_raw_html][/vc_column][/vc_row]

How to setup registration/login in WPCargo using Theme My Login(TML)

[vc_row][vc_column width=”1/4″][vc_widget_sidebar sidebar_id=”sidebar_3″][/vc_column][vc_column width=”3/4″][vc_column_text]

How to setup registration, login and my account page in WPCargo using Theme My Login(TML) and WPCargo Clients Addons

This is a step by step guide to help you setup the Login or Registration in WPCargo using Theme My Login Plugin(TML) in WordPress.

Plugin Needed

  1. We need to Install the Theme My Login into our WordPress Website
  2. After Installing the TML Plugin it will generate pages with a shortcode.
    – Login Page
    – Logout Page
    – Lost Password Page
    – Register Page
    – Reset Password Page
  3. Go to General Settings then check the Membership – Anyone can register and choose WPCargo Client on New User Default Role.
  4. Create a page for your client accounts and use the  shortcode on the content of the page.
  5. After adding the page we will let the newly registered user to redirect on there Accounts Page by doing that go to TML>General and check the Enable Custom Redirection.
  6. Go to TML>Redirection and find the WPCargo Client Role then choose the custom location and paste the link of your Account Page. When you’re done click the save changes at the bottom of the page.

[/vc_column_text][vc_raw_html]JTNDc2NyaXB0JTIwYXN5bmMlMjBzcmMlM0QlMjIlMkYlMkZwYWdlYWQyLmdvb2dsZXN5bmRpY2F0aW9uLmNvbSUyRnBhZ2VhZCUyRmpzJTJGYWRzYnlnb29nbGUuanMlMjIlM0UlM0MlMkZzY3JpcHQlM0UlMEElM0NpbnMlMjBjbGFzcyUzRCUyMmFkc2J5Z29vZ2xlJTIyJTBBJTIwJTIwJTIwJTIwJTIwc3R5bGUlM0QlMjJkaXNwbGF5JTNBYmxvY2slM0IlMjB0ZXh0LWFsaWduJTNBY2VudGVyJTNCJTIyJTBBJTIwJTIwJTIwJTIwJTIwZGF0YS1hZC1sYXlvdXQlM0QlMjJpbi1hcnRpY2xlJTIyJTBBJTIwJTIwJTIwJTIwJTIwZGF0YS1hZC1mb3JtYXQlM0QlMjJmbHVpZCUyMiUwQSUyMCUyMCUyMCUyMCUyMGRhdGEtYWQtY2xpZW50JTNEJTIyY2EtcHViLTA1MDY1Mzg0MjY0NTY4NzclMjIlMEElMjAlMjAlMjAlMjAlMjBkYXRhLWFkLXNsb3QlM0QlMjIxNjk0OTc1MjIyJTIyJTNFJTNDJTJGaW5zJTNFJTBBJTNDc2NyaXB0JTNFJTBBJTIwJTIwJTIwJTIwJTIwJTI4YWRzYnlnb29nbGUlMjAlM0QlMjB3aW5kb3cuYWRzYnlnb29nbGUlMjAlN0MlN0MlMjAlNUIlNUQlMjkucHVzaCUyOCU3QiU3RCUyOSUzQiUwQSUzQyUyRnNjcmlwdCUzRQ==[/vc_raw_html][/vc_column][/vc_row]

Setup Client in WPCargo Plugin

[vc_row][vc_column width=”1/4″][vc_widget_sidebar sidebar_id=”sidebar_3″][/vc_column][vc_column width=”3/4″][vc_column_text]

How to add Client account users using  WPCargo Client Accounts Add-ons

  1. Go to Admin Dashboard>Users>Add New, add the client details in the Role chose WPCargo_Client
  2. You can add more info for the client by editing there user info in Users>All Users then choose the client that you want to edit.
  3. You can view the client on shipment details by editing or adding a new shipment and there details will auto generate on the fields.

[/vc_column_text][vc_raw_html]JTNDc2NyaXB0JTIwYXN5bmMlMjBzcmMlM0QlMjIlMkYlMkZwYWdlYWQyLmdvb2dsZXN5bmRpY2F0aW9uLmNvbSUyRnBhZ2VhZCUyRmpzJTJGYWRzYnlnb29nbGUuanMlMjIlM0UlM0MlMkZzY3JpcHQlM0UlMEElM0NpbnMlMjBjbGFzcyUzRCUyMmFkc2J5Z29vZ2xlJTIyJTBBJTIwJTIwJTIwJTIwJTIwc3R5bGUlM0QlMjJkaXNwbGF5JTNBYmxvY2slM0IlMjB0ZXh0LWFsaWduJTNBY2VudGVyJTNCJTIyJTBBJTIwJTIwJTIwJTIwJTIwZGF0YS1hZC1sYXlvdXQlM0QlMjJpbi1hcnRpY2xlJTIyJTBBJTIwJTIwJTIwJTIwJTIwZGF0YS1hZC1mb3JtYXQlM0QlMjJmbHVpZCUyMiUwQSUyMCUyMCUyMCUyMCUyMGRhdGEtYWQtY2xpZW50JTNEJTIyY2EtcHViLTA1MDY1Mzg0MjY0NTY4NzclMjIlMEElMjAlMjAlMjAlMjAlMjBkYXRhLWFkLXNsb3QlM0QlMjIxNjk0OTc1MjIyJTIyJTNFJTNDJTJGaW5zJTNFJTBBJTNDc2NyaXB0JTNFJTBBJTIwJTIwJTIwJTIwJTIwJTI4YWRzYnlnb29nbGUlMjAlM0QlMjB3aW5kb3cuYWRzYnlnb29nbGUlMjAlN0MlN0MlMjAlNUIlNUQlMjkucHVzaCUyOCU3QiU3RCUyOSUzQiUwQSUzQyUyRnNjcmlwdCUzRQ==[/vc_raw_html][/vc_column][/vc_row]

Woocommerce and WPCargo Integration

[vc_row][vc_column width=”1/4″][vc_widget_sidebar sidebar_id=”sidebar_3″][/vc_column][vc_column width=”3/4″][vc_column_text]We already created a add-ons for the Woocommerce and WPCargo Integration. This is the step by step for setting up the add-ons.

Please follow these steps.

  1. You need to install the Latest Version of Woocommerce.
  2. Install the latest version of WPCargo.
  3. Install Woocommerce and WPCargo Integration add-ons (Please do contact us for more info about the add-ons)
  4. Create a product in Woocommerce and the product price is 0
  5. Go to WPCargo>Woocommerce and WPCargo Integration Settings and choose the product that you created.
  6. Create a page for quotation Shortcode to use for quotation page – [wpcargo_cargo_quote result_page_id=”402″]
    result_page_id attribute is for the result page of the quotation.
  7. For the Result Page Shortcode – [wpcargo_cargo_quote_result]

[/vc_column_text][vc_raw_html]JTNDc2NyaXB0JTIwYXN5bmMlMjBzcmMlM0QlMjIlMkYlMkZwYWdlYWQyLmdvb2dsZXN5bmRpY2F0aW9uLmNvbSUyRnBhZ2VhZCUyRmpzJTJGYWRzYnlnb29nbGUuanMlMjIlM0UlM0MlMkZzY3JpcHQlM0UlMEElM0NpbnMlMjBjbGFzcyUzRCUyMmFkc2J5Z29vZ2xlJTIyJTBBJTIwJTIwJTIwJTIwJTIwc3R5bGUlM0QlMjJkaXNwbGF5JTNBYmxvY2slM0IlMjB0ZXh0LWFsaWduJTNBY2VudGVyJTNCJTIyJTBBJTIwJTIwJTIwJTIwJTIwZGF0YS1hZC1sYXlvdXQlM0QlMjJpbi1hcnRpY2xlJTIyJTBBJTIwJTIwJTIwJTIwJTIwZGF0YS1hZC1mb3JtYXQlM0QlMjJmbHVpZCUyMiUwQSUyMCUyMCUyMCUyMCUyMGRhdGEtYWQtY2xpZW50JTNEJTIyY2EtcHViLTA1MDY1Mzg0MjY0NTY4NzclMjIlMEElMjAlMjAlMjAlMjAlMjBkYXRhLWFkLXNsb3QlM0QlMjIxNjk0OTc1MjIyJTIyJTNFJTNDJTJGaW5zJTNFJTBBJTNDc2NyaXB0JTNFJTBBJTIwJTIwJTIwJTIwJTIwJTI4YWRzYnlnb29nbGUlMjAlM0QlMjB3aW5kb3cuYWRzYnlnb29nbGUlMjAlN0MlN0MlMjAlNUIlNUQlMjkucHVzaCUyOCU3QiU3RCUyOSUzQiUwQSUzQyUyRnNjcmlwdCUzRQ==[/vc_raw_html][/vc_column][/vc_row]

WPCargo Adding of Branches or City on each User

[vc_row][vc_column][/vc_column][/vc_row][vc_row][vc_column width=”1/4″][vc_widget_sidebar sidebar_id=”sidebar_3″][/vc_column][vc_column width=”3/4″][vc_column_text]WPCargo Adding of Branches or City on each User


The first step is to add a new option for Branches


  1. Login to your admin account
  2. On your admin dashboard go to Settings > Branch/Outlet Code
    You can add more option for Branch or Outlet by click Add Button
  3. For Adding of City Code, It is the same process with adding of Branches, First you will go to Settings > City Code

  4. After adding more option on Branches or City Code we can now assign it to users. First we need to go on Users > Edit Users then choose a user that you created to assign on the branch or City Code by clicking edit
  5. At the bottom of the page at the WPCargo Set Location section you can now assign the user on which Branch or City Code


  6. After assigning a user please click Edit Users button to save the data

[/vc_column_text][vc_raw_html]JTNDc2NyaXB0JTIwYXN5bmMlMjBzcmMlM0QlMjIlMkYlMkZwYWdlYWQyLmdvb2dsZXN5bmRpY2F0aW9uLmNvbSUyRnBhZ2VhZCUyRmpzJTJGYWRzYnlnb29nbGUuanMlMjIlM0UlM0MlMkZzY3JpcHQlM0UlMEElM0NpbnMlMjBjbGFzcyUzRCUyMmFkc2J5Z29vZ2xlJTIyJTBBJTIwJTIwJTIwJTIwJTIwc3R5bGUlM0QlMjJkaXNwbGF5JTNBYmxvY2slM0IlMjB0ZXh0LWFsaWduJTNBY2VudGVyJTNCJTIyJTBBJTIwJTIwJTIwJTIwJTIwZGF0YS1hZC1sYXlvdXQlM0QlMjJpbi1hcnRpY2xlJTIyJTBBJTIwJTIwJTIwJTIwJTIwZGF0YS1hZC1mb3JtYXQlM0QlMjJmbHVpZCUyMiUwQSUyMCUyMCUyMCUyMCUyMGRhdGEtYWQtY2xpZW50JTNEJTIyY2EtcHViLTA1MDY1Mzg0MjY0NTY4NzclMjIlMEElMjAlMjAlMjAlMjAlMjBkYXRhLWFkLXNsb3QlM0QlMjIxNjk0OTc1MjIyJTIyJTNFJTNDJTJGaW5zJTNFJTBBJTNDc2NyaXB0JTNFJTBBJTIwJTIwJTIwJTIwJTIwJTI4YWRzYnlnb29nbGUlMjAlM0QlMjB3aW5kb3cuYWRzYnlnb29nbGUlMjAlN0MlN0MlMjAlNUIlNUQlMjkucHVzaCUyOCU3QiU3RCUyOSUzQiUwQSUzQyUyRnNjcmlwdCUzRQ==[/vc_raw_html][/vc_column][/vc_row]